Chapter 15: CSS, JavaScript, and Ajax
One of the definitive technologies of Web 2.0 is Ajax, which means Asynchronous JavaScript and XML and allows the browser to communicate with a server without needing to refresh the page the user is viewing. Interestingly, Ajax doesn’t necessarily need to use JavaScript or XML, so it is only the Asynchronous part of the name that is the truly important aspect of the technology.
The world of JavaScript web frameworks is changing as fast now as the world of Python web frameworks was five years ago. Early versions of Pylons officially supported the Prototype and Script.aculo.us libraries used by Ruby on Rails, but despite this, Pylons users actually used a range of JavaScript frameworks. Two things quickly became apparent:
Pylons users choose whichever framework best provides the tools they need, rather than going with the official library.
JavaScript frameworks for the most part actually operate quite independently from the web framework that is using them. After all, one set of code runs on the server, and the other runs on the client.
The latest versions of Pylons (and in particular, WebHelpers) do not integrate any JavaScript framework, and as a result, you are free to choose whichever framework you prefer.
At the time of writing, the following three JavaScript frameworks are the most popular with Pylons developers:
JQuery
YUI
ExtJS
One of the main benefits of YUI is that it is more than just a JavaScript framework. It also has tools for managing CSS and for creating user interfaces.
Adding YUI to Your Project
You can use YUI in your project in two ways; the first is to copy the YUI library to your project’s public directory and have Pylons serve the files, and the second is to use the files that Yahoo serves directly from its content delivery network (CDN).
Because Yahoo has servers all over the world, it is more likely that it will have a server physically near the person using your application, which should mean that users a long way from the server serving your Pylons application might get a small performance improvement.
I don’t know about you, but when I’m responsible for a web site, I like to be in control of as many of the dependencies as possible; therefore, despite the possible benefits, I recommend installing YUI into your public directory. That way, if someone should trip over a wire and disconnect a server at Yahoo, your application won’t be affected.
You can download the latest version of YUI from http://developer.yahoo.com/yui/download/. This book describes version 2.6.0.
To add YUI to a Pylons project, unzip the download into the project’s public directory:
$ cd public
$ unzip yui_2.6.0.zip
You need to serve files from the build directory only, although the other folders contain useful documentation and examples you might want to browse. Remove the files you don’t need with this:
$ cd yui
$ rm -r as-docs as-src assets docs examples tests index.html README
I usually also rename the build directory with the version number of the YUI library I’m using so that I can later use a different version alongside the current one:
$ mv build 2.6.0
The examples in this chapter will assume you have set up YUI in this way.
Resetting the Browser CSS
Anyone who has ever created a web site for one browser only to find that it looks completely different on another will understand this problem: different browsers interpret the same CSS in different ways. Fixing the broken style on one browser then makes it look different in the first, and before long you are tearing your hair out.
YUI has a fairly effective solution to this problem: reset browser styles across all browsers before you start coding your CSS; then, since the styles you add don’t rely on the styles the browser implementation has decided to add by default, your styles stand a much greater chance of being consistent across different browsers.
You can add the YUI reset.css style sheet by adding the following lines to the <head> section of your HTML page:
<link rel="stylesheet" type="text/css" href="/yui/2.6.0/reset/reset-min.css">
To add the style sheet to a Pylons application with the YUI files in the public directory as you added earlier, you would use this in the head of your HTML in your base template:
${h.stylesheet_link(h.url_for('/yui/2.6.0/reset/reset-min.css'))}
Always make sure the reset.css style sheet is defined before any others; otherwise, you might find that your carefully coded styles are reset when you didn’t expect them to be. You'll need to add this import to your lib/helpers.py file:
from webhelpers.html.tags import stylesheet_link
Tip
It is much easier to use the YUI reset.css style at the beginning of a project before you define any styles rather than trying to apply it after other styles are already in place, so I strongly recommend you use it in all your projects from the beginning.
You can find more information about the reset.css style sheet at http://developer.yahoo.com/yui/reset/.
Once you have reset all the styles, there’s a good chance you’ll want some common ones back. For example, <p> tags usually have a margin, and the various headings should be different sizes. Once again, the YUI team has thought of this, and common styles are defined in the base.css file. You can add the base.css file by adding this line to the head of your HTML document:
${h.stylesheet_link(h.url_for('/yui/2.6.0/base/base-min.css'))}
Notice that for both the base and reset style sheets, I have included minimized versions (they have -min added just before the file extension). These have all the unnecessary whitespace removed so that they are faster for a browser to download and parse. If you ever want to take a look at the styles they contain, you can look at the nonminimized versions, which are identical except for the whitespace.
Fonts
Another area developers sometimes struggle with is fonts. Typically you want the fonts to display at a particular size across all browsers, but you don’t want to specify those sizes explicitly using px units because that would prevent certain browsers from adjusting the font size based on the size a user has chosen from a browser menu.
Once again, YUI has a style sheet that comes to the rescue, this time named fonts.css, which sets up font families and sizes so that they render consistently across browsers as 13-pixel Arial with 16-pixel line spaces. The <pre> and <code> elements render in monospace.
You can then specify any font sizes you want to use as a percentage of the default sizes, as shown in Table 15-1.
If You Want This Size in Pixels (px) |
Declare This Percent (%) |
|---|---|
10 |
77 |
11 |
85 |
12 |
93 |
13 |
100 |
14 |
108 |
15 |
116 |
16 |
123.1 |
17 |
131 |
18 |
138.5 |
19 |
146.5 |
20 |
153.9 |
21 |
161.6 |
22 |
167 |
23 |
174 |
24 |
182 |
25 |
189 |
26 |
197 |
Table 15-1. Pixels to Percent Translation
Be sure to always use percentages in your application, not the corresponding pixel size.
You can include fonts support in a Pylons application by adding the following after the reset CSS import in the <head> section of your HTML:
${h.stylesheet_link(h.url_for('/yui/2.6.0/fonts/fonts-min.css'))}
Tip
The sharp-eyed amongst you might have spotted that you could achieve similar font standardization using ems, but the percentage technique described here results in more consistent rendering across browsers.
If you want to change the font family, you need to provide only the specific font you’re interested in and not any fallbacks. When your font is missing, YUI provides a fallback for you.
For example, you would write this:
font-family: "Times New Roman";
and not this:
font-family: "Times New Roman", serif;
Grids
Another frequent problem in web development is the creation of grid layouts. Of course, you can always use tables to lay out your HTML content, but this is considered bad practice and is heavily frowned upon by CSS experts because table-based designs don’t degrade gracefully. For example, with a table layout, if your screen resolution is too small, your users will be forced to scroll. CSS layouts, on the other hand, can cause one column of information to appear below another when the browser width is too small, which is generally considered better.
Sites such as Amazon still use table-based layout for some aspects of their pages, so the importance of always using CSS layouts all the time is debatable. Of course, you could also detect the screen resolution with JavaScript and provide a different layout for small screens, but this requires extra work and will not work if the browser doesn’t support JavaScript or has it disabled.
Using a CSS grid framework makes setting up a CSS layout much easier. First you should declare your doctype as HTML 4 strict to force browsers into standards mode for rendering. You can do this by making sure the top of your HTML file looks like this:
<!DOCTYPE HTML PUBLIC "-//W3C//DTD HTML 4.01//EN"
    "http://www.w3.org/TR/html4/strict.dtd">
<html>
<head>
You also need to include the YUI grids.css file, but using grids also requires the reset and fonts CSS files to be used. Rather than including three separate files, YUI also provides a combined and minified file called reset-fonts-grids.css that you can use instead like this:
<link rel="stylesheet" type="text/css"
    href="/yui/2.6.0/reset-fonts-grids/reset-fonts-grids.css">
Although the file doesn’t have -min as part of the file name, this is a fully minified CSS file.
You could also include this in a template with this line:
${h.stylesheet_link(h.rul_for('/yui/2.6.0/reset-fonts-grids/reset-fonts-grids.css))}
YUI assumes you will want a header, body, and footer in your HTML page, so to use the YUI grid, you need to set up your page’s HTML like this with a <div> tag containing three other <div> tags:
<div id="doc">
   <div id="hd"><!-- header --></div>
   <div id="bd"><!-- body --></div>
   <div id="ft"><!-- footer --></div>
</div>
The id attribute of the inner <div> elements must be as shown earlier, but the id of the outer <div> element can be customized to determine the width of the page. You have the following options:
<!-- #doc = 750px width, centered-->
<div id="doc"></div>

<!-- #doc2 = 950px width, centered -->
<div id="doc2"></div>

<!-- #doc3 = 100% width -->
<div id="doc3"></div>

<!-- #doc4 = 974px width, centered -->
<div id="doc4"></div>
It’s also possible to create your own page widths, but for the vast majority of cases, the YUI defaults are fine.
As an example, to create a content area with a 100 percent width, you would use an id of doc3 on the outer <div> element, as shown here:
<div id="doc3">
   <div id="hd"><!-- header --></div>
   <div id="bd"><!-- body --></div>
   <div id="ft"><!-- footer --></div>
</div>
Once you’ve set up your template with the correct ID to specify the width of the content, you can think about how content within the header, body, and footer is arranged. YUI provides three types of grids you can use separately or combine to achieve a huge variety of different layouts:
Template presets
Nesting grids
Special nesting grids
Template presets give you common configurations for two-column layouts with a column on the left or the right, and nesting grids and special nesting grids give you more control to produce more complex layouts, as you’ll see in the following sections.
Template Preset Grids
Template preset grids are used after you have chosen the overall width of the content to subdivide either the header, body, or footer into two columns, one of which has a fixed width. To achieve, this you need to add some extra markup to either the header, body, or footer <div>. In this example we are splitting the body into two columns. The extra markup is shown in lines 3-6:
- ::
- linenothreshold
5
<div id="bd">
     <!-- body -->
     <div id="yui-main">
        <div class="yui-b"></div>
     </div>
     <div class="yui-b"></div>
</div>
- ::
- linenothreshold
5000
You then choose which template preset to use by adding a class to the same outer <div> element that was used earlier to specify the width. Table 15-2 lists the options.
Template Class |
Preset Description |
|---|---|
.yui-t1 |
160px on left |
.yui-t2 |
180px on left |
.yui-t3 |
300px on left |
.yui-t4 |
180px on right |
.yui-t5 |
240px on right |
.yui-t6 |
300px on right |
Table 15-2. Template Class Presets
As an example, to have a 240-pixel column on the right of the same layout that you saw in the previous example with a 100 percent width, you would use an outer <div> element with a class="yui-t5" attribute:
<div id="doc3" class="yui-t5">
   <div id="hd"><!-- header --></div>
   <div id="bd">
       <!-- body -->
       <div id="yui-main">
          <div class="yui-b"></div>
       </div>
       <div class="yui-b"></div>
   </div>
   <div id="ft"><!-- footer --></div>
</div>
This will produce the desired layout. What is more, you can also use a similar structure in the header and footer divs, but because it is the class of the outer div that defines the layout, the header, footer, and body all use the same layout with the template preset approach.
Sometimes you might want the content in the second <div class="yui-b"> element to appear in the HTML before the first, perhaps for search engine optimization reasons or perhaps to put your navigation before your content for accessibility reasons. If you are using a YUI template preset, you can change the order of the two columns in the HTML without changing how they are displayed. For example, the altered markup in lines 5-8 will produce the same results:
- ::
- linenothreshold
5
<div id="doc3" class="yui-t5">
   <div id="hd"><!-- header --></div>
   <div id="bd">
       <!-- body -->
       <div class="yui-b"></div>
       <div id="yui-main">
          <div class="yui-b"></div>
       </div>
   </div>
   <div id="ft"><!-- footer --></div>
</div>
- ::
- linenothreshold
5000
Notice that the naked <div class="yui-b"> element now comes before the one wrapped in <div id="yui-main">.
Nested Grids
Within the basic templates you can nest further grids so that each grid you nest divides the content area in two, with each area taking up 50 percent of the available space. Here’s an example of how to do this:
<div class="yui-g">
    <div class="yui-u first"> </div>
    <div class="yui-u"> </div>
</div>
The important point to notice is that the first child of the grid has to be marked with the class first to ensure the grids work in all the main browsers. You can also nest nested grids within other nested grids to create more complex layouts.
Special Nested Grids
It isn’t always particularly useful to subdivide areas in half, so YUI provides five special nested grids that subdivide grids in the ratios given in Table 15-3.
Special Grid Class |
Ratios |
|---|---|
.yui-gb |
1/3, 1/3, 1/3 |
.yui-gc |
2/3, 1/3 |
.yui-gd |
1/3, 2/3 |
.yui-ge |
3/4, 1/4 |
.yui-gf |
1/4, 3/4 |
Table 15-3. Grid Class Ratios
Let’s extend the example from the “Template Presets” section to use the yui-gf class in the header so that you can have a logo on the left taking up 1/4 of the page and the main navigation tabs on the right taking the remaining 3/4 of the space, while the body remains split in two with a 240-pixel column on the right.
Here’s what the updated HTML looks like:
<div id="doc3" class="yui-t5">
    <div id="hd">
       <div class="yui-gf"><!-- the "special grid" -->
         <div class="yui-u first"><img src="/image/logo.png" alt="Logo" /></div>
         <div class="yui-u"><!-- Navigation tabs here --></div>
      </div>
    </div>
   <div id="bd">
       <!-- body -->
       <div id="yui-main">
          <div class="yui-b"></div>
       </div>
       <div class="yui-b"></div>
   </div>
   <div id="ft"><!-- footer --></div>
</div>
Notice that although in this example you are using a special nested grid directly in the header, you can also put them within template preset regions and nested grids too.
Updating SimpleSite to Use CSS Grids
Now that you’ve seen the theory of how to use YUI’s CSS reset style sheet, fonts, and grids, you can update the SimpleSite project to use them too.
Start by preparing the YUI source code as described at the beginning of the chapter:
$ cd public
$ unzip yui_2.6.0.zip
$ cd yui
$ rm -r as-docs as-src assets docs examples tests index.html README
$ mv build 2.6.0
Make sure the first HTML in the templates/base/index.html file looks like this:
<!DOCTYPE HTML PUBLIC "-//W3C//DTD HTML 4.01//EN"
"http://www.w3.org/TR/html4/strict.dtd">
<html>
<head>
Then edit the head() def to add the YUI combined reset-fonts-grids.css file, which includes the grid styles:
<%def name="head()">
    ${h.stylesheet_link(h.url_for('/yui/2.6.0/reset-fonts-grids/reset-fonts-grids.css'))}
    ${h.stylesheet_link(h.url_for('/css/main.css'))}
</%def>
For this example, you’re going to have a two-column layout with a header and footer. You’d like the right column to be 240-pixels wide and contain the menu navigation and the list of tags that can be used on the page. You’ll put the main navigation tabs in the header and style the footer to match it.
Replace the <body> part of the base/index.html file that currently looks like this:
<body>
    ${self.header()}
    ${self.tabs()}
    ${self.menu()}
    ${self.heading()}
    ${self.breadcrumbs()}
    ${self.flash()}
    ${next.body()}
    ${self.footer()}
</body>
with the YUI grids version that looks like the following. Notice the id=doc3 attribute on the outer <div> element to make the content use 100 percent of the width. The self.heading() def is now also called in the header, not the body:
<body>
    <div id="doc3">
        <div id="hd">
           ${self.heading()}
           ${self.header()}
           ${self.tabs()}
        </div>
        <div id="bd">
            ${self.breadcrumbs()}
            ${self.flash()}
            ${self.menu()}
            ${next.body()}
        </div>
        <div id="ft">
            ${self.footer()}
        </div>
   </div>
</body>
Next, add the markup to use a template preset for a 240-pixel column on the right. Notice the class="yui-t5" attribute and the two extra <div class="yui-b"> elements with the content for the two columns:
<body>
    <div id="doc3" class="yui-t5">
        <div id="hd">
            ${self.heading()}
            ${self.header()}
            ${self.tabs()}
        </div>
        <div id="bd">
            <div id="yui-main">
                <div class="yui-b">
                    ${self.breadcrumbs()}
                    ${self.flash()}
                    ${next.body()}
                </div>
            </div>
            <div class="yui-b">
                 ${self.menu()}
            </div>
        </div>
        <div id="ft">
            ${self.footer()}
        </div>
   </div>
</body>
Finally, modify the header to contain a logo or title on the left and space for some additional links on the right using a special nested grid:
<body>
    <div id="doc3" class="yui-t5">
        <div id="hd">
             <div class="yui-gc">
                 <div class="yui-u first">${self.heading()}</div>
                 <div class="yui-u"></div>
             </div>
            ${self.header()}
            ${self.tabs()}
        </div>
        <div id="bd">
            <div id="yui-main">
                <div class="yui-b">
                    ${self.breadcrumbs()}
                    ${self.flash()}
                    ${next.body()}
                </div>
            </div>
            <div class="yui-b">
                 ${self.menu()}
            </div>
        </div>
        <div id="ft">
            ${self.footer()}
        </div>
   </div>
</body>
You’ll use Arial in SimpleSite for the body text, but you’ll use Georgia for the headings. Since all the font styles have also been reset, you’ll need to specify the heading size too. Add this to the end of the public/css/main.css file:
body{
    font-family: Arial;
}
#hd {
    background: #87AFD7;
    border-bottom: 3px solid #113958;
}
h1 {
    font-family: Georgia;
    color: #003;
    font-size: 197%;
    margin: 15px 20px 10px 20px;
}
h2 {
    font-family: Georgia;
    color: #003;
    font-size: 138.5%;
    margin-top: 1.5em;
}
#menu {
    padding-top: 20px;
}
#breadcrumbs {
    margin-bottom: 20px;
}
#doc3 {margin:auto;}
#bd, #ft {
    padding: 20px;
}
form {
    margin-top: 20px;
}
form table td {
    padding-bottom: 3px;
}
This particular grid template has a 10-pixel margin that you don’t need. The earlier #doc3 style removes it. You’ll also need to tweak two of the #maintabs styles. They should now look like this:
#maintabs ul {
    margin: 0px;
    padding: 0px;
    height: 21px;
}
#maintabs {
    margin: 0;
    padding: 10px 0 0px 17px;
}
Now that you have two columns, let’s move the tags to the right column. Edit the templates/derived/page/view.html file so that the lines relating to the tags look like this:
<%def name="tags(available_tags)">
    <h2>Tags</h2>
    ${h.form_start(h.url_for(controller='page', action='update_tags', id=c.page.id), method='post')}
        ${h.checkbox_group(name='tags', selected_values=None, align="vert", options=available_tags)}
        ${h.submit(value="Save Tags", name='submit')}
    ${h.form_end()}
</%def>

<%!
    from formencode import htmlfill
    from webhelpers.html import literal
%>

<%def name="menu()">
${parent.menu()}
% if c.available_tags:
${literal(htmlfill.render(capture(self.tags, c.available_tags), c.selected_tags))}
% endif
</%def>
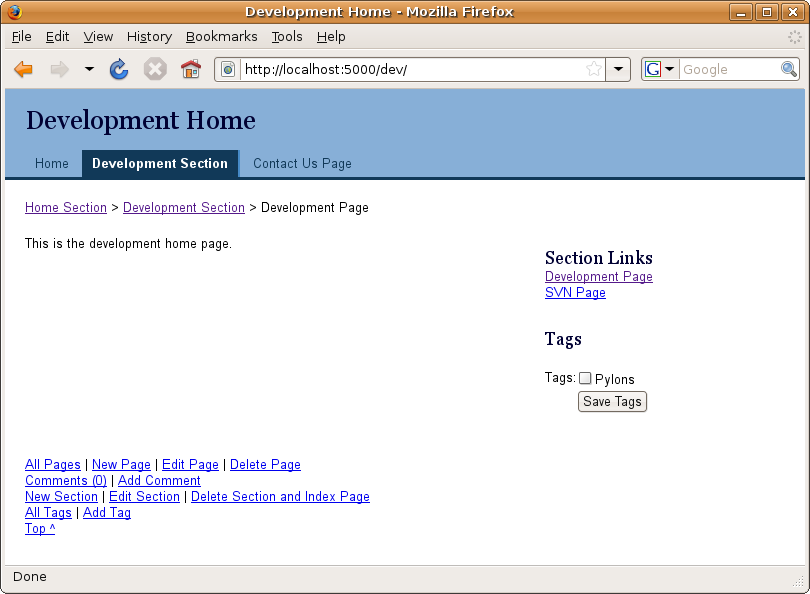
With these changes in place and with one Pylons tag added, the development home page now looks like Figure 15-1. You might need to force a browser refresh before the new styles are noticed. If the section links and tags aren't on the right, check you have added the yui-t5 class to the outer div.
Now that you have a good understanding of modern CSS techniques and have seen how they are applied with the YUI framework, it’s time to investigate another tool of the modern web developer: JavaScript. Before you do that, though, I’ll introduce a very useful plug-in called Firebug that will help you greatly when using JavaScript in the browser.
Introducing Firebug
When you are working with client-side code in the browser, you should consider using a tool that many developers find invaluable called Firebug. If you haven’t come across Firebug yet, it is a plug-in for the Firefox browser that contains a range of useful tools for client-side web development, including a JavaScript console, Document Object Model (DOM) inspector, debugger, profiler, CSS display, HTTP request and response analysis tool, and a CSS visualization and manipulation tool.
If you don’t have Firebug installed already, you should install it now. First download Firefox from http://www.mozilla.com/firefox, and after installing it, install the Firebug plug-in from http://getfirebug.com/. Firebug is available only for Firefox, but if you aren’t already using Firefox for development, the Firebug plug-in is a good reason to consider switching.
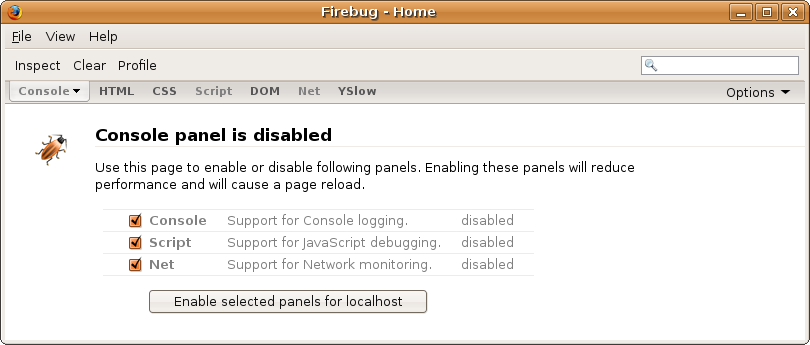
Let’s use the Firebug console to test some JavaScript. Start the SimpleSite application, and then visit http://localhost:5000/. Open Firefox, and select Tools > Firebug > Open Firebug in New Window from the menu. (Alternatively, you can press Ctrl+F12 or Command+F12 on a Mac to open Firebug from within Firefox.) Select the boxes for Console, Script, and Net, and click the Enable Selected Panels for Localhost button, as shown in Figure 15-2.
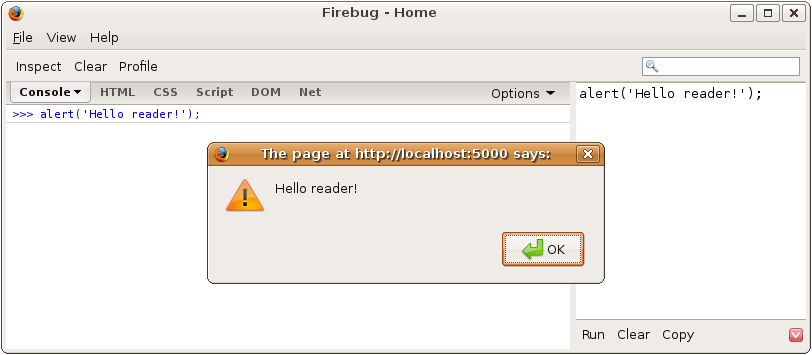
Once you’ve enabled Firebug, you will be able to test the JavaScript examples from the previous section in Firebug. Click the red square button on the bottom right of Firebug to put Firebug into multiline input mode. You can then enter JavaScript statements more than one line a time and click the Run button. In Figure 15-3, I’ve entered alert('Hello reader!') and clicked Run. Firebug copies the input to the console on the left and executes the JavaScript as if it were being executed in the scope of the browser window. This means you have access to all the DOM functions you would have if you were writing JavaScript for the browser normally.
Firebug has a huge amount of useful functionality, some of which you’ll see over the course of this chapter. It’s well worth visiting http://getfirebug.com and clicking each of the pictures on the home page to get a full idea of what Firebug can do.
Introducing JavaScript
Although Python programmers can typically get a long way by copying and tweaking JavaScript examples, if you want to write any serious code to run on the browser, you need to learn JavaScript properly.
JavaScript is a language in its own right, and although it is frequently used for DOM manipulation (changing HTML within a browser), the JavaScript language shouldn’t be confused with the DOM API.
Note
JavaScript isn’t actually based on Java at all but was given its name for political reasons between Sun and Netscape early in the history of web browsers. Microsoft also had an implementation called JScript, but today the standard is defined as ECMA-262, so JavaScript should really be known as ECMAScript.
At first glance, JavaScript appears fairly familiar to Python programmers; it has functions, hash tables (dictionaries), objects, and arrays as well as string, number, boolean, and date types. It also has all the standard control statements such as if, while, else, try, catch, and so on. Apart from curly braces and semicolons, JavaScript seems very approachable. Once you start using the language, though, you quickly realize that things aren’t quite as simple as they seem. Consider this example (I’m using js> here to differentiate a JavaScript prompt from a traditional Python prompt >>>):
js> var a = [1,2,3,4];
js> a.length;
4
js> delete a[1];
js> a
[1, undefined, 3, 4]
js> a.length
4
As you can see, the Array type doesn’t behave much like the Python equivalent. In JavaScript an Array behaves more like a Python dictionary where all the keys are consecutive numbers than a traditional array.
Let’s look at functions:
js> function b(c, d) {
    alret(c);
    alert(d);
}
js> b(1)
This doesn’t look a million miles from Python, but when you run it, you are shown two alert boxes with the values 1 and undefined. No error is thrown even though the function appears to take two parameters and you have specified only one. Try calling b() with three parameters, and you’ll find it appears to just ignore the third, again without an error. That’s not what you would expect from Python, although it’s perfectly rational once you understand how JavaScript works. As you’ll see later, functions in JavaScript also have a local variable called arguments that behaves a bit like an array of all the arguments passed.
Perhaps the most obvious difference is in the way JavaScript handles inheritance. Unlike Python, JavaScript doesn’t have the concept of a class. Instead, it uses something called prototypal inheritance where objects inherit directly from other objects. This is quite different from Python and will cause you a good deal of confusion if you don’t understand it. As you’ll learn shortly, though, it is really rather simple.
Another difference to be aware of is the way variables are defined. Consider this example:
js> var a = function() {
    b = 1;
    var c = 2;
}
js> a()
js> b
1
js> c
undefined
In this case, the variable c was declared using the var keyword so is considered local to the scope of function a(). Because b wasn’t declared using the var keyword, it was assigned to global scope. This is potentially a very bad thing because if a programmer forgot to use var when declaring another variable called b in another library you are using, both would refer to the same global b, which could cause problems that are difficult to track down.
In web browsers you can actually access the global scope directly because it is aliased as window. Continuing with the previous example, because b was declared without the var keyword, you could write this:
js> window.b
1
All the issues highlighted so far are simply meant to demonstrate that JavaScript is different from Python; it isn’t worse, but if you expect it to work like Python without learning its differences, you are likely to quickly get confused, particularly because JavaScript often returns the value undefined in situations where Python would raise an exception. I’ve seen many Python programmers curse JavaScript when their code doesn’t work the way it is supposed to, but if you take the time to learn it properly, you will quickly come to appreciate the language.
JavaScript Essentials
This isn’t a book on JavaScript, so I don’t intend to go through the whole language in detail; I’ll give you enough of an understanding to start writing your own code and to highlight one or two traps Python programmers might fall into.
Tip
If you want to learn JavaScript, I highly recommend you invest the time in watching Douglas Crockford’s JavaScript videos. In them he talks you through all aspects of the language, inheritance, namespace issues, scope, closures, and more. Although the talks are fairly long, they are by far the most time-effective way to learn JavaScript properly. You’ll struggle to understand JavaScript without them. Douglas has also written a book recently called JavaScript: The Good Parts, which I can strongly recommend for teaching you the important principles of the JavaScript language while avoiding the traps. It isn’t focused on web development, though, but there are plenty of other books that are.
Operators of Interest
The full list of operators is defined in the ECMAScript specification at http://www.ecma-international.org/publications/standards/Ecma-262.htm, but certain equality operators, such as the + and / operators, are of particular interest to Python programmers because their behavior is slightly different.
JavaScript has two types of equality operators:
=== compares the type and value of the object. If they are different types or are the same type but with different values, the comparison will return false. Its inverse is !==.
== tries to coerce one of the operands into the type of the other in order to make the comparison. Its inverse is !=.
If you don’t realize that == and != could be changing the types of the values you are comparing, you could run into trouble. The vast majority of the time you will want to use === and !== since they are the conceptual equivalents of == and != in Python. Using == and != in JavaScript is usually a mistake.
The + operator is used for adding numbers together as you would expect, but it is also used for string concatenation. Python has this behavior too, but the difference between JavaScript and Python is that in JavaScript if any of the operands are not strings, it will silently convert them to strings and then concatenate them:
js> 4+"2"
"42"
Python would raise a TypeError if you try to concatenate objects that aren’t strings or Unicode in Python, so it can be slightly unexpected. This also means you can do operations such as this in JavaScript to convert a string to a number:
js> +"42"
42
In Python the / operator doesn’t always mean a traditional divide operation. When the operands are integers, Python performs a floor divide operation. That is, it performs a division and discards the remainder. When one of the operands is a float, it performs a traditional division. For example:
# Python:
>>> 10/3
3
>>> 10/3.0
3.3333333333333335
In JavaScript, all numbers are 64-bit floating-point numbers (JavaScript doesn’t differentiate between floats and integers in the way Python does), so / always behaves like a Python operation on floats:
// JavaScript
js> 10/3
3.3333333333333335
Types
JavaScript technically has nine types, although you’ll only ever use the data types: Undefined, Null, Boolean, String, Number, and Object. You will also come across the value NaN, and you will use arrays (which are objects) and functions.
You’ll learn about objects a bit later in this chapter, so let’s start by looking at booleans. Booleans take the values true and false and behave as you would expect. In JavaScript, true==1 is true, but true===1 is false because a boolean is not the same as a number type.
Strings consist of 16-bit characters (technically the UCS-2 character set if you are interested), although there is no character type as such. You represent a character as a string of length 1. Strings can be declared with either single or double quotes and are immutable, which means if you want to perform some operation on a string, it will create a new one rather than change the existing one.
There is only one number type in JavaScript, and it is a 64-bit floating-point number. This can cause some problems because it means arithmetic is approximate. For example, 10/3 is not 31?3 but is 3.3333333333333335. Normally the small difference won’t be a problem, but in some circumstances it might be, so it is worth being aware of. There is a special value NaN that means “Not a Number,” which is the result of undefined or erroneous operations such as dividing by 0. This is unlike Python, which would raise an exception when an error occurred. Any arithmetic operation with NaN as an input will have NaN as a result, so it can sometimes be a little tricky to work out where the actual error occurred. NaN is not equal to anything, including NaN.
null is a value that isn’t anything, analogous to None in Python. Many of the DOM operations such as document.getElementById() return null when a data structure cannot be found.
The final value you will run into is undefined. It’s the default value for variables that haven’t been assigned a value yet and for parameters that are passed to a function. It is also the value of missing members in objects. Python doesn’t have anything equivalent to undefined because the same circumstances that would lead to an undefined value in JavaScript either aren’t possible or would cause an exception to be raised in Python. For example, Python is strict about the arguments passed to a function, and you would get a KeyError if you tried to access a member that didn’t exist. Python programmers tend to rely on these features of the language and are surprised when errors don’t occur in their JavaScript code. Once you understand JavaScript’s behavior in this regard, you are much less likely to be confused.
It can sometimes be a bit tricky to remember how to check the type of objects or whether objects are null or undefined, so the YUI library defines some functions in YAHOO.lang that make it easier. Here are some examples from the YUI documentation:
// true, an array literal is an array
YAHOO.lang.isArray([1, 2]);

// false, an object literal is not an array
YAHOO.lang.isArray({"one": "two"});

// however, when declared as an array, it is true
function() {
    var a = new Array();
    a["one"] = "two";
    return YAHOO.lang.isArray(a);
}();

// false, a collection of elements is like an array, but isn't
YAHOO.lang.isArray(document.getElementsByTagName("body"));

// true, false is a boolean
YAHOO.lang.isBoolean(false);

// false, 1 and the string "true" are not booleans
YAHOO.lang.isBoolean(1);
YAHOO.lang.isBoolean("true");

// null is null, but false, undefined and "" are not
YAHOO.lang.isNull(null); // true
YAHOO.lang.isNull(undefined); // false
YAHOO.lang.isNull(""); // false

// a function is a function, but an object is not
YAHOO.lang.isFunction(function(){}); // true
YAHOO.lang.isFunction({foo: "bar"}); // false

// true, ints and floats are numbers
YAHOO.lang.isNumber(0);
YAHOO.lang.isNumber(123.123);

// false, strings that can be cast to numbers aren't really numbers
YAHOO.lang.isNumber("123.123");

// false, undefined numbers and infinity are not numbers we want to use
YAHOO.lang.isNumber(1/0);

// true, objects, functions, and arrays are objects
YAHOO.lang.isObject({});
YAHOO.lang.isObject(function(){});
YAHOO.lang.isObject([1,2]);

// false, primitives are not objects
YAHOO.lang.isObject(1);
YAHOO.lang.isObject(true);
YAHOO.lang.isObject("{}");

// strings
YAHOO.lang.isString("{}"); // true
YAHOO.lang.isString({foo: "bar"}); // false
YAHOO.lang.isString(123); // false
YAHOO.lang.isString(true); // false

// undefined is undefined, but null and false are not
YAHOO.lang.isUndefined(undefined); // true
YAHOO.lang.isUndefined(false); // false
YAHOO.lang.isUndefined(null); // false
You might think that the results described here are obvious, but in fact performing the tests yourself can be quite tricky because there are often subtleties that can catch you out. It is much safer to use the YUI library’s functions when performing these tests.
Functions
You can declare a function in two ways. The first is to give the function a name when you declare it as was done in the "Introducing JavaScript" section for the function b(). The second is to create an anonymous function and assign it to a variable, as shown here:
js> var change = function(a){ a = 2; }
Both methods are equivalent, but anonymous functions can be very useful in their own right. There are actually four different ways to invoke functions, but in this chapter you’ll stick to the method that is most similar to Python.
As with Python, any objects passed into functions as parameters are passed by reference to functions. This means that if (within a function) you modify an object passed as a parameter to that function, you are actually modifying the object itself, not a copy of it:
js> var change = function(a) { a = 2; }
js> var a = 1;
js> change(a);
js> a;
2
There is actually a subtlety going on when you call a function. In addition to the parameters you’ve passed in, you will find two other variables in the function’s scope: this and arguments. You’ll learn about this later, but arguments is an array-like object mentioned earlier that contains the values of each of the parameters passed to the function regardless of how many parameters the function is defined to accept. It is array-like because although it has a .length property, it is not formally a JavaScript Array. You can use it like this to create a function which multiplies all its arguments together:
js> function multiply() {
js>     var i;
js>     var n = arguments.length;
js>     var result = 1;
js>     for (i = 0; i < n; i += 1) {
js>         result *= arguments[i];
js>     }
js>     return result;
js> }
js> multiply(2, 3);
6
Function Scope and Closures
In JavaScript, variables exist in the scope of the function in which they were defined. This means that even if you put some variables within a block (using curly braces), the variables will have the same scope as they would before or after the block. For example:
function a() {
    var a = 1;
    {
        a = 2;
        var b = 3;
    }
    alert(a); // will have the value 2
    alert(b); // will have the value 3
}
a();
Because variables have function scope, it makes sense to just declare them all at the start of the function rather than when you first use them. This helps avoid the problem of assigning a value to a variable that hasn’t been declared with the var keyword and then finding it has accidentally been assigned to the global scope.
If a function in JavaScript is defined within another function, the inner function will still have access to the variables in the scope of the outer function, even after the outer function has returned.
As an example, think about how you would add an event handler to a button so that when it was clicked, an alert with a message would appear. Consider the following example where there are two buttons. The msg variable is assigned a value, and this is used as both an argument to the add_alert_handler() function and to show_alert(). Then the value of the message is changed.
var add_alert_handler = function (message) {
    return function(e) {
        alert(message);
    };
};

var show_alert(message) {
    alert(message);
};

var msg = 'Alert button clicked';
document.getElementById('alert_button1').onclick = add_alert_handler(msg);
document.getElementById('alert_button2').onclick = show_alert(msg);
msg = 'The message has changed';
When alert button 1 is clicked, the message displayed is “Alert button clicked,” but when alert button 2 is clicked, the message is “The message has changed.” The reason for this is simple. The function show_alert() has access to the msg variable’s value directly so that when msg gets changed, so does the value it displays. Alert button 1, on the other hand, uses a closure, so the value of message that the function defined within add_alert_handler() has access to is a copy defined only in the scope of the returned add_alert_handler() function. When the msg variable is changed, the message variable in the closure remains unchanged.
If you are working with event handlers, you should always use closures or use a tool such as the YUI event library.
Objects
In JavaScript, objects are similar to dictionaries in Python. For example, suppose you want an object with two attributes, name and age. You could write this in two ways:
var object = new Object();
object.name = 'James';
object.age = 28;


object = {
    name: "James",
    age: 28
};
Both of these are identical because in JavaScript objects and dictionaries (or hash tables as they are called) are the same thing, but it is generally recommended you use the object literal notation to define objects (the example using the curly brackets) because it is clearer what is happening.
Regardless of how you create your objects, you can add new members or access existing members using either . or [].
js> object['name'] = 'Mike';
js> object.name;
'Mike'
js> object.name = 'Ben';
js> object['name'];
'Ben'
One point to be aware of is that quite a few words in JavaScript are reserved even though they aren’t used. You can access object members whose names are not reserved words using the . notation. You can access any member regardless of the name using the [] notation.
As well as assigning strings and numbers to objects, you can also assign functions:
var simpleMaths = {
    add: function(a,b){
        return a+b;
    },
    subtract: function(a,b){
        return a-b;
    }
};
You can now use your object for calculations:
js> simpleMaths.add(1+1);
2
You can probably already see that this object is beginning to behave a bit like Python objects with methods.
this
this is available in any function; its value is bound at runtime, and what it refers to depends on the calling form of the function that was called. For ordinary functions that are not members of an object, this refers to the global namespace, that isn’t particularly useful but when the function is bound to an object, this refers to the object itself. This is useful because it allows you to access the other members of the object from within the function. In the context of a method, this behaves like an implicit version of Python’s self. Here’s an example:
var simpleMaths = {
    _value: 0
    add: function(a){
        return this._value + a;
    },
    subtract: function(a){
        return this._value - b;
    }
};
This time the functions use a member variable to store a value, and then the methods add and subtract from that value. In Python any class member that starts with an _ character is considered private, and although the programmer is asked politely not to modify private members, the language itself doesn’t prevent you from doing so.
In JavaScript, you can use closures to create member variables that genuinely are private:
var singleton = function () {
    var privateVariable;
    function privateFunction(x) {
        // do something with privateVariable
    }

    return {
        firstMethod: function (a, b) {
            // do something with privateVariable, privateFunction(),
            // this.firstMetod() or this.secondMethod()
        },
        secondMethod: function (c) {
            // do something with privateVariable, privateFunction(),
            // this.firstMetod() or this.secondMethod()
        }
    };
}();
In this example, privateVariable and privateFunction() are declared in the scope of the function, so because of closure, firstMethod() and secondMethod() have access to them even after the function returns. The brackets after the final curly brace call the function, so singleton is assigned the object returned by the function, but with each of the methods still having access to the private variable and function. This means you can do this to call firstMethod() or secondMethod():
js> singleton.firstMethod();
but you can’t access singleton.privateVariable or singleton.privateFunction(). They are truly private in this case, unlike in Python.
Namespaces
Because variables in JavaScript are declared in the global namespace if they are not declared with the var keyword inside a function, it is fairly easy for programs that use the same names in the global namespace to change each other’s variables accidentally.
One solution to this problem is to set up a single object as global for your application and take special care to create all your application’s other objects and variables as members of that object. This is exactly what happens in YUI where all the functionality of the library is contained within the YAHOO namespace.
YUI recommends you choose an all-uppercase name for your namespace to minimize the chance of your name conflicting with an application that is already using that name. Say you wanted to create one called SIMPLESITE. You could do this:
var SIMPLESITE = {};
Now when you want to create objects global to your application, you can add them as members of the SIMPLESITE object like this:
SIMPLESITE['test'] = 1;
and access the test variable like this:
SIMPLESITE.test;
If you are writing a YUI component, you might like to use the YAHOO.namespace() function that sets up a namespace for you under the YAHOO namespace. You can also use it to set up nested namespaces if you specify the namespaces you want separated by a . character. For example:
// Creates a namespace for "myproduct2", and for "mysubproject1"
YAHOO.namespace("myproduct1.mysubproject1");
YAHOO.myproduct1.mysubproject1.Class1 = function(info) {
    // do something here...
};
Closures and anonymous functions can also be used to wrap an entire application in a function, keeping its namespace localized:
function() {
// local namespace declarations here.
}()
The last () invokes the function.
Inheritance
Inheritance is object-oriented code reuse, which is a useful pattern. In the classical model, objects are instances of classes, and classes inherit from other classes. In the prototypal model, objects inherit directly from other objects, and there are no classes. They do this with a secret link to the object being inherited from. In Mozilla browsers, you can actually access this secret link with __proto__, but this is nonstandard and shouldn’t be used.
JavaScript actually has a third way to create an object that I didn’t mention earlier: via an object() function. The function isn’t part of JavaScript, but you can write it easily enough yourself like this:
function object(o) {
    function F() {}
    F.prototype = o;
    return new F();
}
When you use this function, you can specify which object your object should be linked to:
var oldObject = {
    firstMethod: function () {...},
    secondMethod: function () {...}
};

// create a new instance of the object
var newObject = object(oldObject);

// augment it
newObject.thirdMethod = function () {...};

// create a new instance of the augmented object
var thirdObject = object(newObject);

// this object has all three methods we've defined.
thirdObject.firstMethod();
This is very simple and doesn’t need traditional classes. If you try to access a property of the object and the object lacks that property, each object in the inheritance chain will be tested, and if it has the property, that property will be used. Finally, if the member can’t be found in any of the objects, then undefined will be returned. The name for this pattern is linkage.
This model has a few interesting consequences. For example, if you were to change the firstMethod() of oldObject, the change would be immediately visible in newObject and thirdObject. Changes to thirdObject will have no effect on oldObject or newObject because when their members are accessed, it is only the objects they are linked to that are searched.
If you were to change the thirdMethod() method of thirdObject, then thirdObject.thirdMethod() would behave differently from newObject.thirdMethod() because they now point to different functions. In this circumstance, deleting thirdMethod() from thirdObject won’t actually delete the method entirely; it will just delete the function assigned to the name thirdMethod for thirdObject, but because thirdObject is still linked to newObject when you access thirdObject.thirdMethod(), the thirdMethod() from newObject will be called instead. This might surprise you if you don’t understand that linkage works in only one direction. Incidentally, JavaScript doesn’t impose any limits on the lengths of the inheritance chains you can create, but bear in mind that deep nested object hierarchies require lots of lookups so aren’t as efficient as shallow hierarchies.
The process of adding new methods and members to an object is called augmentation.
Prototypes
You might be wondering what an object’s secret link points to if you create an object that isn’t explicitly linked to anything else. The answer is that it points to Object.prototype that contains a number of methods that all objects therefore inherit.
Similar prototypes exist for other types:
Object.prototype
Array.prototype
Function.prototype
Number.prototype
String.prototype
Boolean.prototype
and these can be used to modify how all objects of their type behave.
It isn’t considered particularly good practice to modify the prototype, though, because it’s possible that modifications made by one JavaScript application will affect how another application behaves.
When you iterate over an object in a for loop, you get all of its members, all of its parent’s members, all of its parent’s parent’s members, and so on, right down to all the members of Object.prototype. This isn’t always what you want, so JavaScript has a hasOwnProperty() function used like this:
for (var name in object) {
    if (object.hasOwnProperty(name)) {
        // within the loop, name is the key of the current member
        // object[name] is the current value

        // only names associated with members of the current object
        // will be available here
    }
}
This enables you to distinguish between the object you want to iterate over and its parent members.
JavaScript in HTML
It is generally not a good idea to include too much JavaScript in the body of an HTML document because it is harder to version control, compress, or validate with external tools. A much better way is to write JavaScript in a separate text file and include it in the HTML document like this:
<script src="/yourscript.js" />
You don’t need to use language="javascript"; it is a leftover from a time when Microsoft wanted people to be able to use VBScript in browsers, and you don’t actually need to use type="text/javascript" because the correct MIME type for JavaScript is application/javascript or application/ecmascript and because the browser trusts the MIME type set by the server that serves the document over what you specify in the <script> tag. That being said, if you want your XHTML to be valid, you should add the type="text/javascript" attribute.
Another leftover from the past is the way developers use comments to hide JavaScript embedded in HTML from old browsers. They might do this:
<script>
<!--
    alert("Script goes here.");
// -->
</script>
If browsers come across tags they don’t understand, they are supposed to ignore the tag but continue processing other nested tags. This means very old browsers that didn’t understand JavaScript would print the JavaScript as text, and the comments would force them to ignore the JavaScript instead. Nowadays, there are so few of these browsers left that you might just as well ignore the comments. If you include your JavaScript from separate files (as advised earlier), you avoid this problem anyway.
The Document Object Model
As well as understanding the basics of the JavaScript language, it is useful to understand a little bit about how browsers work and how they deal with web pages returned from Pylons using the Document Object Model (DOM).
The DOM is an API for HTML and XML documents. It provides a representation of the document, enabling you to modify its structure and content as well as the way the HTML elements are rendered. All the properties, methods, and events from the DOM are organized into objects so that they can be accessed from JavaScript. In fact, some of the functions you might use quite frequently when programming JavaScript actually come from the DOM and not the JavaScript language itself. For example, setTimeout(), alert(), confirm(), and prompt(text, default) are all DOM functions.
The vast majority of coding you will do for the web browser will use the DOM APIs, and although the JavaScript language itself is similar across browsers, the DOM APIs that different browsers expose can still be different in some frustrating ways. It is these differences more than anything else that make client-side web development in JavaScript difficult, and it is why you are strongly advised to use a framework such as YUI or JQuery to abstract away the complications.
The basis of the DOM is the parse tree generated when the browser parses the HTML. The top of the parse tree is the #document element. Beneath it the individual nodes are available, and any text between HTML tags is stored in a #text node. Internet Explorer ignores whitespace, whereas the W3C DOM standard includes it as text nodes. It’s worth noting that the HTML elements are named with the uppercase version of their tag name, so node.tagName for the <body> node will be BODY.
The #document node can be accessed from JavaScript as the global document. The element representing the <body> tag is accessed as document.body, and the element representing the <html> tag is document.documentElement. This arguably isn’t the best naming convention, but it is the one we are stuck with. It’s worth noting that the browser might add elements such as <head> to the DOM tree even if they weren’t present in the original HTML, so the DOM tree doesn’t always exactly match the HTML source.
Tip
Try entering document.documentElement into a Firebug console to double-check this. If you click the <html> object displayed as the return value in the console, Firebug will open its HTML view at that element. From there you can click the DOM tab to see all properties associated with that element. This is typical of the sort of useful functionality Firebug contains.
Each HTML element in the tree can be given an ID to uniquely identify it, which means the same ID cannot be used by two elements in the page. You can then access the DOM element for that node with this:
document.getElementById(id)
Notice that the last part of the method is Id and not ID as you might have expected. You can also access elements that have a name attribute like this:
document.getElementsByName(name)
Because there can be more than one element with the same name in the DOM tree, this function uses the plural Elements and returns an array. The name attribute should be used for form fields and for the names of windows and frames, and the id attribute should be used everywhere else.
You can also access the nodes beneath a particular node by the name of their tags like this:
node.getElementsByTagName(tagName)
It is also possible to access certain collections of DOM elements as properties of the document object, such as document.forms, document.images, and the Microsoft-specific document.all. Generally speaking, it is better to give the elements you are interested in a name or id attribute and just use the methods mentioned earlier rather than using the collections.
Manipulating the DOM
The DOM also provides methods for manipulating the DOM. If you’ve ever done any XML DOM work using Python’s xml.dom.minidom module, these methods will be familiar to you.
These methods create new DOM nodes that won’t yet be linked to the DOM:
- document.createElement(tagName)
Creates a tag of type tagName.
- document.createTextNode(text)
Creates a text node.
- node.cloneNode()
Clones an individual element on its own.
- node.cloneNode(true)
Clones an element and all of its descendents.
These methods manipulate the DOM:
- node.appendChild(new)
Adds the new node or tree of nodes as the last child of node
- node.removeChild(child)
Removes the child node child from node and returns it
- node.insertBefore(new, sibling)
Adds the new node or tree of nodes as a child of node but before the node sibling
- old.parentNode.replaceChild(new, old)
Replaces the node old with the node or node tree new
Notice the syntax of the replaceChild() method is a little messy because it requires access to the parent node of the node being replaced. This is how the API works, though.
It can be quite cumbersome to programmatically build DOM structures using the methods outlined earlier, so most modern browsers also provide an .innerHTML attribute to each node. Any value set as the value of .innerHTML is parsed by the browser’s HTML parser and converted into DOM nodes, replacing the node’s existing children. This is really handy because you can generate complex fragments of HTML using Pylons, fetch them with the browser using Ajax, and then simply set the .innerHTML value of the node whose HTML should be changed. This is a technique you’ll see later in this chapter.
The Event Model
The final piece of the JavaScript puzzle to learn about is the event model. As with the language itself and the DOM, Python programmers can usually guess what is going on enough to make their code work but then get very frustrated on the odd occasion when the code they’ve written doesn’t behave in the way they expect.
There are two models for event handling in browsers: trickling down and bubbling up. In the trickling-down model, when an event occurs, it is passed to the #document node, and then it works its way down the DOM tree until finally it gets to the node where something happened. In the bubbling-up model, the event is first passed to the node at which something happened and then on to each of the parents in turn until the top of the DOM tree is reached. If you have many child nodes for which something might happen (say a load of images that might change in some way as the mouse moves over them), it would be expensive to add a handler to each image. Instead, using the bubbling-up approach, you could add just the one handler to the parent node of all the images, and it could respond to the event instead.
Whether tricking down or bubbling up is the best event model is a somewhat academic discussion because Microsoft supports only bubbling up, so if you want to write portable code, this is the event model you have to use. The differences between the browsers don’t stop there. There are three different ways of adding an event to a node:
node["on"+type] = function() {}
node.attachEvent("on"+type, f);
node.addEventListener(type, f, false);
All the browsers support the first method, but only Microsoft supports the second, and the W3C standard suggests the third method. The third method here always takes false as the third argument because this specifies that the handler should use the bubbling-up method, which is what you’d need for cross-browser code.
Unfortunately, the differences don’t end there. In Microsoft browsers, the event itself is accessed as the global event object, whereas in the others it is passed as the first argument to the event handler.
Because of these differences, it is highly recommended you use a third-party JavaScript library for event handling because it will abstract away these differences. Here’s a simple example using YUI events to attach a simple onclick handler to an element:
var elm = document.getElementById("button-1");
function fnCallback(e) {
    alert("Button 1 was clicked.");
}
YAHOO.util.Event.addListener(elm, "click", fnCallback);
Once you have written an event handler, you’ve installed it, and it has been fired, you might want to prevent the event from bubbling up to nodes higher up the DOM tree. Again, the way to do this differs across browsers, so it’s best to do it with a framework like YUI. In the YUI case, you’d call YAHOO.util.Event.stopPropogation(e) where e is the event passed to the handler.
Despite that the event is no longer bubbling up, you might also want to prevent the default behavior. For example, clicking a link would navigate the user to a different page, and you might like to prevent this too. You can do so with YAHOO.util.Event.preventDefault(e) where again e is the event passed to the handler. YUI also provides a convenience method YAHOO.util.Event.stopEvent(e), which stops the bubbling and prevents the default.
Caution!
One point to be aware of is that in Internet Explorer 6 if you remove a DOM node without removing all the event handlers attached to it, a memory leak might occur, so you should always remove event listeners (by setting them to null) before you remove a DOM node so that the garbage collector can clean them up. Better still, use a JavaScript framework to handle this for you.
Same Origin Policy
An important point to be aware of when writing JavaScript code is the same origin policy, which is a security measure implemented by browsers to prevent a document or script loaded from one “origin” from getting or setting properties of a document from a different “origin.” This means a script loaded from Example.com can’t change variables in a script loaded from Example.org. The purpose of this is to prevent one site maliciously reading or modifying data presented to a user from another domain.
An origin in this context is a domain name accessed on a particular port with a particular protocol. If any of these is different, most browsers will treat them as different origins except Internet Explorer, which ignores the port and will thus treat two domain names with the same protocol as the same origin regardless of the port.
You can sometimes work around the same origin policy; one method is this: if the two origins you want to be able to communicate with each other are on the same second-level domain, you can change the JavaScript variable document.domain for both documents to that second-level domain. For example, if scripts from some.example.com and other.example.com both set document.domain='example.com', they will be able to communicate. This works only if the two documents have a common sub-domain.
Browser Detection vs. Feature Detection
Because browsers often behave differently, it can be useful to try to work out which browser the user is using to visit a site and to write different JavaScript depending on the browser being used. There is, however, one very serious problem with this approach: browsers lie.
Browser manufacturers have found that lots of old code already exists to try to detect which browser is being used. As a result, when they release new browsers, much of this code wouldn’t work correctly if the browser correctly identified itself because it wasn’t coded for the new browser. As a result, browser manufacturers frequently identify themselves as other browsers. For example, Internet Explorer 7 identifies itself as Mozilla/4.0 (compatible; MSIE 7.0b; Windows NT 6.0).
A much better approach is to simply test whether a browser has a particular feature you want to use and, if it does, to use it. That way, the code will work for any browser that has the feature, not just ones that pass your browser detection tests.
Of course, by using a JavaScript framework like YUI or JQuery, you isolate yourself from browser differences because they are handled by the framework, so you are less likely to need either browser or feature detection code.
Now that you’ve seen how JavaScript works in the browser, let’s return once more to the SimpleSite application and use some YUI JavaScript to spruce up the application.
Adding Animation to the SimpleSite Flash Message
Although the flash message system you created in Chapter 8 works perfectly well, you can draw the users’ attention to it better by adding some animation. In this section, you’ll learn how to animate the message so that it appears after the page has loaded and fades away after the user clicks it. To achieve this, you’ll need to use YUI’s animation facilities.
YUI provides a number of animation classes. You’ll need the following:
- YAHOO.util.Anim
For animating any numeric attributes of an HTMLElement
- YAHOO.util.ColorAnim
For animating attributes related to color
Since the animation appears only on the view pages, you need to add the JavaScript imports to the derived/pages/view.html template. Animation functionality requires both the YUI animation JavaScript file and the combined yahoo-dom-event.js JavaScript file. Add this def at the end of the view.html template:
<%def name="js()">
    <script src="/yui/2.6.0/yahoo-dom-event/yahoo-dom-event.js" type="text/javascript"></script>
    <script src="/yui/2.6.0/animation/animation-min.js" type="text/javascript"></script>
</%def>
You’ll also need to update base/index.html with a new js() def so that this code gets called. At the top of the template, add line 11:
- ::
- linenothreshold
5
## -*- coding: utf-8 -*-

<%namespace name="navigation" file="/component/navigation.html" import="*" />\

<!DOCTYPE HTML PUBLIC "-//W3C//DTD HTML 4.01//EN"
"http://www.w3.org/TR/html4/strict.dtd">
<html>
<head>
    <title>${self.title()}</title>
    ${self.head()}
    ${self.js()}
</head>
<body>
- ::
- linenothreshold
5000
At the bottom of the template, add this so that child templates that don’t have a js() def will inherit an empty one:
<%def name="js()"></%def>
The flash element will start out invisible, so update the styles in public/css/main.css so the #flash style looks like this:
#flash {
    background: #ffc;
    padding: 5px;
    border: 1px dotted #000;
    margin-bottom: 20px;
    height: 0px;
    overflow: hidden;   /* so we can animate from zero height */
}
Next you need to write the JavaScript function to make the flash message appear. Add this to the bottom of the js() def you just created in the view.html template after the <script> tags:
% if session.has_key('flash'):
<script type="text/javascript">
YAHOO.util.Event.onAvailable(
    'flash',
    function() {
        var a = new YAHOO.util.Anim(
            YAHOO.util.Dom.get('flash'), {
                height: {
                    to: 16
                }
            },
            0.4,
            YAHOO.util.Easing.easeIn
        );
        a.animate();
        YAHOO.util.Event.on('flash', 'click', function() {
                var b = new YAHOO.util.Anim(
                    YAHOO.util.Dom.get('flash'), {
                        opacity: {
                            to: 0
                        },
                    },
                    0.4
                );
                b.onComplete.subscribe(function(){
                    YAHOO.util.Dom.setStyle('flash', 'display', 'none');
                });
                b.animate();
            }
        )
    }
);
</script>
% endif
Notice that you use the onAvailable event that is triggered as soon as the HTML element is available to start the animation as soon as possible. As the animation is running, you also install an event handler to make the flash message gracefully disappear by changing the CSS opacity until it is 0.
Now that the code is in place, try editing and saving a page. You should see the yellow flash box appear gradually with its height growing until it reaches its full size. Then, when you click the message, it fades out and disappears. Unfortunately, Internet Explorer doesn’t understand the CSS opacity tag, so the fading out won’t work on Internet Explorer.
Ajax
By now you should have a good understanding of JavaScript, the DOM, and event handling and have some understanding of how to use YUI. Turn your attention to one of the most useful JavaScript techniques: Ajax.
Ajax is a technique that allows the browser to communicate asynchronously with the server. This means you can fetch data from the browser and use JavaScript to update part of a web page without needing to refresh the page.
Using Ajax would be useful in one area of the SimpleSite application in particular: the edit form. At the moment when you edit a page or section, it is possible to enter a value into the before field for a page that isn’t in that section. The FormEncode validation picks up the error, but it would be better if the before field was a drop-down list containing values automatically populated with pages or subsections of the section currently selected in the section drop-down list. Figure 15-4 shows how this would look.
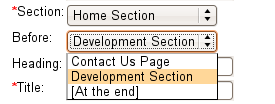
This pattern of populating one drop-down list from the values of another using Ajax applies to any situation where you have hierarchical data. First you need to listen for any onchange events from the parent drop-down list. Then you need to contact the server to fetch the HTML for a new before field and replace the old one.
Let’s get started. First you need a function that will return the appropriate values of before for a given section ID. Add this as a static method to model.Nav in model/__init__.py. The exclude option allows you to exclude the current page; after all, it wouldn’t make a lot of sense to have a page or section appear before itself:
class Nav(object):

    # ... existing methods

    @staticmethod
    def get_before_options(section, exclude=None):
        nav_q = meta.Session.query(Nav)
        query = nav_q.filter_by(section=section)
        if exclude is not None:
            query = query.filter(Nav.id != exclude)
        return [(nav.id, nav.name) for nav in query.all()]
In the page controller’s edit method, set the value of c.before_options, (lines 17-18):
- ::
- linenothreshold
5
def edit(self, id=None):
    if id is None:
        abort(404)
    page_q = meta.Session.query(model.Page)
    page = page_q.filter_by(id=id).first()
    if page is None:
        abort(404)
    values = {
        'name': page.name,
        'path': page.path,
        'section': page.section,
        'before': page.before,
        'title': page.title,
        'heading': page.heading,
        'content': page.content
    }
    c.before_options = model.Nav.get_before_options(page.section, page.id)
    c.before_options.append(['', '[At the end]'])
    return htmlfill.render(render('/derived/page/edit.html'), values)
- ::
- linenothreshold
5000
Notice the second line in bold where an extra option is added. This allows a user to specify that the page should be at the end of the section.
You’ll also need to make a similar change to the section controller’s edit() method (lines 14-15):
- ::
- linenothreshold
5
def edit(self, id=None):
    if id is None:
        abort(404)
    section_q = meta.Session.query(model.Section)
    section = section_q.filter_by(id=id).first()
    if section is None:
        abort(404)
    values = {
        'name': section.name,
        'path': section.path,
        'section': section.section,
        'before': section.before,
    }
    c.before_options = model.Nav.get_before_options(section.section, section.id)
    c.before_options.append(['', '[At the end]'])
    return htmlfill.render(render('/derived/section/edit.html'), values)
- ::
- linenothreshold
5000
Of course, the page and section controller new() actions also require a similar change. Notice that this time the before key isn't deleted from the values dictionary, just set to contain an empty string. Update the page controller’s new() action to look like this (lines 5-7 are the updated ones):
- ::
- linenothreshold
5
def new(self):
    values = {}
    values.update(request.params)
    if values.has_key('before') and values['before'] == u'None':
        values['before'] = ''
    c.before_options = model.Nav.get_before_options(values.get('section', 0))
    c.before_options.append(['', '[At the end]'])
    return htmlfill.render(render('/derived/page/new.html'), values)
- ::
- linenothreshold
5000
Update the section controller’s new() action to look like this (again, lines 5-7 are the updated ones):
- ::
- linenothreshold
5
def new(self):
    values = {}
    values.update(request.params)
    if values.has_key('before') and values['before'] == u'None':
        values['before'] = ''
    c.before_options = model.Nav.get_before_options(values.get('section', 0))
    c.before_options.append(['', '[At the end]'])
    return htmlfill.render(render('/derived/section/new.html'), values)
- ::
- linenothreshold
5000
Now update the derived/nav/fields.html template to replace the existing before field with this:
${h.field(
    "Before",
    h.select(
        "before",
        id='before',
        options = c.before_options,
        selected_values=[],
    ),
)}
The before field now correctly displays the possible options for the section selected when the form is rendered, but you still need to add the JavaScript to detect when the section value changes and trigger the Ajax calls.
You’ll write a JavaScript function called callAjax() that takes the URL for the Ajax call as the first argument, the ID of the field containing the value you want to submit as the second, and the name of the element to take the result as the third. Add this to the bottom of the derived/nav/fields.html file:
<%def name="js()">
    <script src="/yui/2.6.0/yahoo-dom-event/yahoo-dom-event.js" type="text/javascript"></script>
    <script src="/yui/2.6.0/connection/connection-min.js" type="text/javascript"></script>

    <script type="text/javascript">
    function callAjax(url, field, replace){
        var callback = {
            success: function(o) {
                YAHOO.util.Dom.get(replace).innerHTML = o.responseText;
            },
            failure: function(o) {
                alert("Failed to retrieve required information.");
            }
        }
        url = url +'?selected='+YAHOO.util.Dom.get(field).value;
        var transaction=YAHOO.util.Connect.asyncRequest('GET', url, callback, null);
    }
    </script>
</%def>
Notice that this code relies on the connection JavaScript library being in place before it is parsed. It also requires the yahoo-dom-event library. Sometimes you will need to access objects from the calling function’s scope in the success() and failure() callbacks. You can do this in YUI by specifying an argument list as a member of the earlier callback object, in addition to the success and failure callbacks used in the previous example. The arguments you specify can then be accessed as o.argument in the callback functions. See the YUI Event documentation for an example.
Add an onchange argument to the h.select() helper for the section field in derived/nav/fields.html so it looks like this:
${h.field(
    'Section',
    h.select(
        "section",
        id='section',
        selected_values=[],
        options=c.available_sections,
        onchange="callAjax('%s', 'section', 'before'); return false;"%(
            h.url_for(controller="nav", action="before_field_options")
        ),
    ),
    required=True
)}
This code triggers an Ajax call to the before_field_options() action. If the call is successful, the before field’s options are replaced with the HTML fragment from the Pylons controller; otherwise, a JavaScript alert box displays an error message.
Next you need to add the before_field_options() action to the nav controller to return the new options with the correct values for the section ID sent in the Ajax call. The new action requires the following import:
from webhelpers.html.tags import HTML
and looks like this:
def before_field_options(self):
    result = []
    for id, label in model.Nav.get_before_options(request.params.getone('selected')):
        result.append(HTML.option(label, value=id))
    result.append(HTML.option('[At the end]', value=''))
    return u''.join(result)
Finally, you need to update the edit.html and new.html templates for both the section and the page. Update derived/page/edit.html, derived/section/edit.html, derived/page/new.html, and derived/section/new.html by adding the following import and def at the end of the files:
<%namespace file="/derived/nav/fields.html" name="navfields" import="js"/>

<%def name="js()">
    ${parent.js()}
    ${navfields.js()}
</%def>
This pulls in the js() def from the derived/nav/fields.html file and adds the contents of its head() def.
At this point, you are ready to test the updated application. Try to edit a page or section; as you change the section you want the item to appear in, an Ajax call is made, and the correct values of before for that section are set automatically.
Debugging Ajax Requests
You can use two tools to debug Ajax requests. The first is the Pylons interactive debugger. If you refer to Chapter 4, you’ll recall that any time an error occurs during a request when Pylons is in debug mode, a header called X-Debug-URL is added to the response containing a URL. The URL is also printed on the console if you are using the paster serve command to serve the Pylons application. If you visit that URL, you will be able to interactively debug the request that caused the error in the same way you debug normal problems in a Pylons application.
On the client side, Firebug is once again the tool of choice. Its console can help you determine any errors that occurred. As an example, the Net tab in Figure 15-5 shows the requests occurring when I edit page 2. The first GET request is to load page 2. The second request is the Ajax request that occurred when I change the section select field. It also shows you how long each request took; this can be very useful in determining how to optimize your Pylons applications, as you’ll see later in the chapter. When you hover your mouse over a request (as I have done on the second request), Firebug shows you the whole request URL. Clicking the + icon shows you the HTTP headers for the request and response, so if an error occurs on an Ajax call, you can also find out the debug URL from the headers displayed by Firebug.
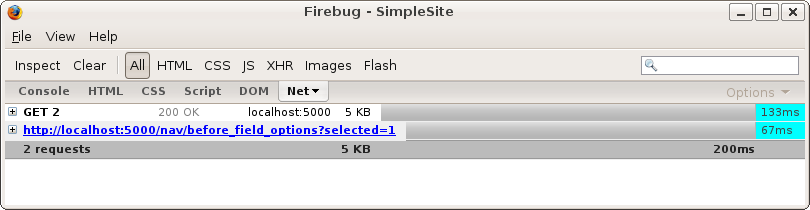
JSON
Although returning HTML from a Pylons controller and using a node’s .innerHTML property to update its content is a perfectly acceptable way of using Ajax, you should be aware of another useful technique.
Instead of taking the approach just described, you could have simply returned the labels and values for the before field from the Pylons controller action and assembled the HTML nodes using DOM manipulation with JavaScript in the browser. If you chose to take this approach, you would have to decide what format you are going to use to send the data in, and the most sensible choice would be a format known as JSON.
JSON stands for JavaScript Object Notation and is quite simply just a string of text written in the same way you would define a JavaScript object using the object literal notation you saw earlier. For example, a JSON data structure representing the before field’s values might look like this:
{
    options: [
        {id: 4, value: "SVN Page"},
        {id: 5, value: "Development Page"},
        {id: "", value: "[At the end]"}
    ]
}
You’ll notice that this looks like the type of data structure you might create in Python, so much so that Pylons provides an @jsonify decorator that you can use on a controller action, which will turn an ordinary Python data structure made up of lists, dictionaries, strings, and numbers into a JSON string.
Add a new action to the nav controller to return a JSON data structure for the before field. You’ll need to import the @jsonify decorator at the top of the file:
from pylons.decorators import jsonify
Now add the controller action like this:
@jsonify
def before_field_json(self):
    result = {
        'options': [
             dict(id=id, value=value) for value, id in model.Nav.get_before_options(
                 request.params.getone('selected'))
         ]
    }
    result['options'].append({'id': u'[At the end]', 'value': u''})
    return result
When the Ajax call is made to this action, the Python dictionary returned is converted to JSON by the @jsonify decorator (which itself uses the simplejson package installed with Pylons), and this is made available in the JavaScript success() callback as o.responseText. Let’s use Firebug to log its value to the console. Update the derived/nav/fields.html file’s js() def so that the callAjax() function looks like this. Line 4 has changed.
- ::
- linenothreshold
5
function callAjax(url, field, replace){
    var callback = {
        success: function(o) {
            console.log(o.responseText);
         },
        failure: function(o) {
            alert("Failed to retrieve required information.");
        }
    }
    url = url +'?selected='+YAHOO.util.Dom.get(field).value;
    var transaction = YAHOO.util.Connect.asyncRequest('GET', url, callback, null);
}
- ::
- linenothreshold
5000
The console object is provided by Firebug so won’t be present on browsers without Firebug. This means using the console object is appropriate only for debugging, and you should always remove all references to it in production code.
Also, update the onchange argument for the select field (lines 8-10) so that when its value changes, it calls the new before_field_json() action:
- ::
- linenothreshold
5
${h.field(
    'Section',
    h.select(
        "section",
        id='section',
        selected_values=[],
        options=c.available_sections,
        onchange="callAjax('%s', 'section', 'before'); return false;"%(
            h.url_for(controller="nav", action="before_field_json")
        ),
    ),
    required=True
)}
- ::
- linenothreshold
5000
If you edit a page or section, enable Firebug, and change the section field to Home Section, you should see this in the Firebug console:
{"options": [{"id": "Contact Us Page", "value": 2}, {"id": "Development Section", "value": 3}, {"id": "Home", "value": 6}, {"id": "[At the end]", "value": ""}]}
This is the string the @jsonify decorator returned, but to be useful, it needs to be turned into a JavaScript object. The safest way to do this is with a JSON parser like the one included with YUI, but since JSON is also valid JavaScript source code, you can also use JavaScript’s eval() function to simply evaluate it. As you’ll see later, though, using eval() has some potential security implications.
Update the js() def in the derived/nav/fields.html file to look like this:
<%def name="js()">
    <script src="/yui/2.6.0/yahoo-dom-event/yahoo-dom-event.js" type="text/javascript"></script>
    <script src="/yui/2.6.0/connection/connection-min.js" type="text/javascript"></script>
    <script src="/yui/2.6.0/json/json-min.js" type="text/javascript"></script>

    <script type="text/javascript">
    function callAjax(url, field, replace){
        var callback = {
            success: function(o) {
                var parsed_options = YAHOO.lang.JSON.parse(o.responseText);
                var evaluated_options = eval('('+o.responseText+')');
                console.log(parsed_options);
                console.log(evaluated_options);
             },
            failure: function(o) {
                alert("Failed to retrieve required information.");
            }
        }
        url = url +'?selected='+YAHOO.util.Dom.get(field).value;
        var transaction = YAHOO.util.Connect.asyncRequest('GET', url, callback, null);
    }
    </script>
</%def>
Once again, the lines that have changed are in bold. If you refresh the page and change the section, you’ll see something like this in the Firebug console:
Object id=Contact Us Page value=2
Object id=Contact Us Page value=2
Both methods produce the same result.
You might be wondering why when evaluating the JSON string with the eval() function you had to add a bracket to the beginning and end of the string. The answer is that it forces JavaScript to unconditionally treat the string as an expression. If you try to call eval() with an empty object string, as in "{}", it returns undefined, which clearly isn’t what you want. Adding the parentheses fixes the problem. As it happens, array literals such as "[]" work fine even without the parentheses, but it is best to use them. Here’s an example demonstrating these effects:
js> eval("{}")
js> YAHOO.lang.isUndefined(eval("{}"))
true
js> eval("({})")
Object
js> eval("[]")
[]
The reason you should always use a JSON parser rather than eval() is that you never quite know whether someone might have found a way to compromise your application to get some illegal characters into the JSON your application has generated. For example, imagine that if instead of the JSON it does generate, the before_field_json() action returned "{options: alert(document.cookies)}". With the eval('('+o.responseText+')') technique, the alert() function gets called, and any cookies the application uses appear in an alert window. Now imagine that rather than calling alert(), a hacker calls a different function. They could potentially get hold of your user’s cookies and set up their own browsers with their cookies. The Pylons application would think that the hacker was actually the real user. Of course, lots of other exploits are possible, but the point is that if a hacker can compromise your JSON, an attack is possible.
js> eval("({options: alert(document.cookies)})")
[The alert window is displayed]
On the other hand, if you use a JSON parser, the JSON will not pass as valid, and a simple JavaScript error will be raised without doing any damage except causing the code that updates the before field not to be called.
js> YAHOO.lang.JSON.parse("{options: alert(document.cookies)}")
SyntaxError: parseJSON
For this reason, you should always use a JSON parser, just to be safe. With this firmly established, let’s remove the lines that refer to the Firebug console object and finish updating the js() def in the derived/nav/fields.html file so that it looks like this:
<%def name="js()">
    <script src="/yui/2.6.0/yahoo-dom-event/yahoo-dom-event.js" type="text/javascript"></script>
    <script src="/yui/2.6.0/connection/connection-min.js" type="text/javascript"></script>
    <script src="/yui/2.6.0/json/json-min.js" type="text/javascript"></script>

    <script type="text/javascript">
    function callAjax(url, field, replace){
        var callback = {
            success: function(o) {
                var parsed_options = YAHOO.lang.JSON.parse(o.responseText);
                var before = document.getElementById(replace);
                // Remove current options
                while(before.hasChildNodes() === true)
                {
                    before.removeChild(before.childNodes[0]);
                }
                // Add new options
                for (var i=0; i<parsed_options.options.length; i++) {
                    var new_option = document.createElement('option');
                    new_option.text = parsed_options.options[i].id;
                    new_option.value =  parsed_options.options[i].value;
                    before.appendChild(new_option);
                }
            },
            failure: function(o) {
                alert("Failed to retrieve required information.");
            }
        }
        url = url +'?selected='+YAHOO.util.Dom.get(field).value;
        var transaction = YAHOO.util.Connect.asyncRequest('GET', url, callback, null);
    }
    </script>
</%def>
If you test the example, you should find it works exactly as it did when you used the .innerHTML technique instead. Which technique you choose to use in your own applications is up to you.
Reducing Page Load Time
If you are including a large number of CSS or JavaScript files in your pages, the length of time it takes to load a page can begin to become significant. The vast majority of the time it isn’t the speed of your Pylons application that affects how fast your application appears to your users. Much more important usually is the speed with which the browser can pull in and process all the files that will need to be loaded and rendered to display the finished web page.
You can generally reduce page load times fairly easily in the following ways:
- Compressing text files
Transmitting less data takes less time. In Chapter 16, I’ll show how you can write some middleware to compress text data automatically.
- Concatenating text files
An overhead is involved in each HTTP request made, so the fewer requests the browser makes, the better.
- Putting multiple icons or image fragments in a single image
You can then use the same image lots of times throughout the page and use CSS to choose which part of the image you display in each place. Again, the fewer images you have to fetch, the fewer HTTP requests are needed, and the faster the page should load.
- Cache data
If the browser can fetch a file from its cache, it doesn’t have to fetch it from the network, so that will be faster. Pylons automatically supports E-Tag caching for the static files it serves, which means that browsers should fetch a new copy only if the E-Tag changes. This can speed things up a little, but since the browser has to make a request to see whether the E-Tag has changed, this isn’t as effective for small files as it is for large ones.
Some other less obvious things can affect page load time too:
- Number of DNS queries
The more different domains (or subdomains) that your page loads information from, the more DNS lookups the browser will have to do to discover the IP addresses associated with those domains. Depending on the number of name servers involved, it can take up to a second or more for each DNS lookup. Of course, the browser will cache the DNS information, but it is worth remembering that the first page load will be quicker if all the resources are served from the same domain. This is particularly worth remembering for applications using Routes’ subdomain feature because you probably wouldn’t want to serve static resources from lots of different subdomains if you could serve them all from the same domain.
- Minimizing JavaScript
Writing JavaScript usually involves adding quite a lot of whitespace. If you use a JavaScript minification tool, it can strip whitespace and comments and also rename local variables to ones that use fewer characters. Again, fewer characters means faster transfer time. One JavaScript minifier is the YUI compressor written in Java and available from http://developer.yahoo.com/yui/compressor/.
- Positioning of CSS and JavaScript within HTML
CSS files should be included with the <link> tag as close to the top of the <head> as possible. This gives browsers all the information they need about the styles as early as possible, which in turn means they can start rendering the page sooner. By contrast, JavaScript <script> tags should go as close to the bottom of the <body> as possible because browsers typically won’t start downloading other resources like images while script downloads are in place, so it makes sense to have them later.
Knowing which of these problems is affecting your site the most is very tricky without a detailed analysis of how long each component takes to load. Luckily, there are tools to help with this. As you saw earlier in the chapter, Firebug’s Net tab displays the time taken for each request as well as the overall page load time, so this will give you a good indication of where files are being requested more than they need to be. If you need detailed information to optimize page load performance, you should download another Firefox plug-in called YSlow which can give you a detailed performance analysis. YSlow relies on Firebug for some of its functionality. You can get YSlow from http://developer.yahoo.com/yslow/, and if you plan on using it, the help page at http://developer.yahoo.com/yslow/help/ is very useful.
Summary
Once again, I covered a lot in this chapter, from CSS grids to prototypal inheritance, DOM manipulation, events, and Ajax. The appropriate use of CSS, JavaScript, and Ajax can really improve your application and allow you to build interfaces that aren’t possible with traditional static HTML.
There is plenty more in the YUI library, and I strongly encourage you to investigate it. I hope that the discussion in this chapter goes some way toward giving you the knowledge you’ll need to begin reading the YUI documentation in earnest. As well as good documentation and plenty of examples, there are also some very handy A4 cheat sheets for each component. Visit http://developer.yahoo.com/yui for more information, but don’t forget that Pylons works equally well with other frameworks like JQuery.
That’s all for Part 2 of the book. In Part 3, you’ll begin looking at expert Pylons topics starting with a discussion of the Web Server Gateway Interface, which is at the core of Pylons’ architecture.