The Tea Light is described in these posts:
This repository is a re-creation of the tea-light using updated versions of all the original tools. The recreation is for a Museum piece in Berlin.
The original used the site caniturniton.com but this is gone, so instead we use
the alt value of the last <area> tag from the graph displayed here:
The actual data is a work in progress, for now this repo contains code for a demo mode.
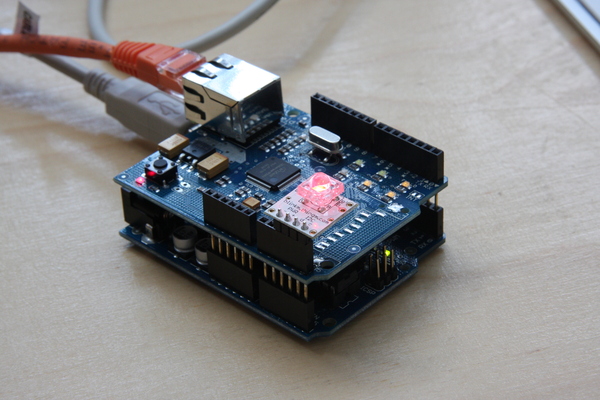
Assemble the arduino by putting the BlinkM in place as shown here:
(You don't need the Ethernet shield for the demo, the BlinkM just goes in the equivalent holes below)
Now download Arduino IDE version 1.6.7 from:
Tip: On Mac OS X, you might need to run it from Downloads, and right click and choose Open to accept that it isn't verified first.
You'll need to git repos. First get the tea-light code:
git clone https://github.com/tea-light/tea-light.git
Then checkout the the latest BlinkM code from here:
git clone https://github.com/todbot/BlinkM-Examples.git
Create a new project called tea-light by choosing File -> New from the
Arduino IDE menu. Call it tea-light.
Now from your project choose Sketch -> Add File ... from the menu, and
navigate to the BlinkM-Examples directory you just checked out and choose the
file arduino/BlinkMTester/BlinkM_funcs.h.
Back in the IDE, click the tea-light tab, then copy and paste the code in the
demo.c file in the tea-light directory you checked out earlier.
Now you can click the tick button on the left of the menu to check your code.
If everything passes, plug your Arduino into the computer via the USB cable.
Next you'll need to tell the Arduino IDE which port the Arduino is on. You can
do this by selecting the correct option from the Tools -> Port -> sub-menu.
Now you can press the Upload arrow (next to the tick button you just clicked
in the toolbar) to deploy the built code to your Arduino.
You should see the tea-light start red, and change colour every few minutes. The demo isn't really random, and might show the same sequence each time you turn it on.
The Live version needs the Arduino Ehternet Shield.
Now that you have demo mode working you can try the live version, this is a bit more involved though.
Copy the contents of live.c into the Arduino IDE in place of the demo.c
code that is there at the moment.
The Arduino needs an IP address and MAC Address. You can generally use the example MAC address in the source code. You'll need to find out your host compter's IP address.
Update this line with your host computer's IP address (this will be your server):
IPAddress server(192,168,0,3);
And this line later in the file:
client.println("Host: 192.168.0.3");
Now you'll need to choose an IP address for the Arduino. If it is on the same network as your server, just choose a different last number greater that isn't in use. For example:
IPAddress ip(192, 168, 0, 177);
Now that you'd arduino is set up you'll need to run the server. This is described next.
Note, the example assumes the server is port 8081. Change this to 80 for a
production environment. The HTTP parsing is very basic. It assumes the HTTP
response will be less than 500 bytes and looks for a sequence of 4 \r or \n
characters to mark the end of the HTTP headers. If the next character is y
for yes then the light goes green, if it is n for no it goes red,
otherwise it is unchanged.
If you have the Go programming language you can build a simple proxy server
that will parse data from a chart provided by the National Grid and return
yes or no to the answer Can I Turn It On?
A real version of this should cache responses for 60 seconds to avoid making too many requests to the National Grid's server.
Setup:
GOPATH=$PWD go get golang.org/x/net/html
Run:
GOPATH=$PWD go run caniturniton.go
With the server running, the Arduino should soon be showing red or green.
caniturniton.go somewhereThe MIT License (MIT) Copyright (c) 2009 Chris Adams and James Gardner
Permission is hereby granted, free of charge, to any person obtaining a copy of this software and associated documentation files (the "Software"), to deal in the Software without restriction, including without limitation the rights to use, copy, modify, merge, publish, distribute, sublicense, and/or sell copies of the Software, and to permit persons to whom the Software is furnished to do so, subject to the following conditions:
The above copyright notice and this permission notice shall be included in all copies or substantial portions of the Software.
THE SOFTWARE IS PROVIDED "AS IS", WITHOUT WARRANTY OF ANY KIND, EXPRESS OR IMPLIED, INCLUDING BUT NOT LIMITED TO THE WARRANTIES OF MERCHANTABILITY, FITNESS FOR A PARTICULAR PURPOSE AND NONINFRINGEMENT. IN NO EVENT SHALL THE AUTHORS OR COPYRIGHT HOLDERS BE LIABLE FOR ANY CLAIM, DAMAGES OR OTHER LIABILITY, WHETHER IN AN ACTION OF CONTRACT, TORT OR OTHERWISE, ARISING FROM, OUT OF OR IN CONNECTION WITH THE SOFTWARE OR THE USE OR OTHER DEALINGS IN THE SOFTWARE.
Back in 2009, Chris Adams and myself worked at Impact Hub Islington on ideas that could teach people about energy use and hopefully reduce impact on the environment. We came up with the concept of the tea light to teach people about dynamic demand (only make tea when there is excess capacity in the grid).
Copyright James Gardner 1996-2020 All Rights Reserved. Admin.