Chapter 17: Pylons’ Internal Architecture
Now that you’ve seen what WSGI is and how it works, in this chapter you’ll look at how Pylons’ architecture is built around the opportunities WSGI provides. Before getting into too much detail, though, it is helpful to put the Pylons architecture in context by looking at how it came about in the first place.
A Bit of History
All web frameworks are fundamentally involved in the process of responding to HTTP requests and generating HTTP responses using APIs that are convenient for developers. These APIs might provide session handling, cookie handling, E-Tag caching, error reporting, or other features that read information from the HTTP request and affect the HTTP response. It turns out that the vast majority of HTTP services that web frameworks provide are easily implemented as WSGI middleware because, as you’ve just learned, middleware has the ability to change all aspects of the HTTP request and the HTTP response, which is exactly what most frameworks’ internal stacks have to do.
Now, just because it is possible to do something doesn’t mean it is always a good idea, but it turns out that building a web framework stack out of WSGI middleware is very useful because once a piece of middleware has been written, it can be used between any WSGI-compatible web server and web application. This means it can be used in any web framework, which in turn means that for the first time WSGI allows web developers to reuse components at the web framework stack level. This is really important because it has three implications:
Developers can easily customize their WSGI frameworks by adding or removing their own middleware components.
Web framework developers no longer need to constantly reinvent the wheel because they can just use existing middleware components instead of creating their own custom implementations.
Users can write their own middleware, such as a custom transaction logger to be used with several applications.
These more than any other reasons are why Pylons exists today. Once the WSGI standard was specified and tools such as Paste began to emerge, many people in the Python community were very keen to refactor existing frameworks such as Django and Zope to be built from WSGI middleware. Understandably, these communities were rather reluctant to stop development to refactor code to use WSGI middleware when it already worked perfectly well as it was. Doing so would benefit the wider Python community that could then reuse much of their code, but this was more effort than it was worth to the communities themselves. As a result, WSGI wasn’t adopted in any of the major frameworks of the time other than as an adaptor to allow them to run on WSGI servers. Finally, late in 2005 Ben Bangert and I started Pylons as a wake-up call to the other Python communities to demonstrate that writing a full-stack Python framework using WSGI middleware was not only possible but would also form the very best basis for developers because it put them in complete control of every aspect of their applications. It would also be the best solution for the wider community because it would create, as a side effect of its architecture, a huge variety of reusable Python components. This was the basis on which the Pylons WSGI architecture was born.
At the same time, not every component a web framework provides is appropriate as WSGI middleware. In keeping with Pylons’ philosophy of developer choice and reusability, the Pylons developers decided early on not to code an integrated set of components for database access, templating, or form creation in the way Django does but rather to tackle the essence of the workflow and underlying technical requirements that each of these components has and provide APIs and written recommendations for how to use these components together. This loosely coupled architecture has meant that Pylons has been able to easily move from SQLObject to SQLAlchemy and from Myghty to Mako (while still supporting alternatives) and is able to support form generation systems as diverse as HTML Fill, ToscaWidgets, and FormAlchemy.
As communities within Python continue to innovate on individual projects, Pylons will continue to be able to use them because the framework isn’t strongly dependent on the other components it recommends, whereas the perceived simplicity of other frameworks, notably Django, comes from its tight integration of components, and this limits that community’s ability to respond to changes. It also severely limits a developer’s opportunity to do things differently if the solution provided out of the box doesn’t quite fit your needs.
So, Pylons’ big secret is that actually it isn’t really a framework in the traditional sense at all; it favors the creation of reusable middleware components over an integrated framework stack and favors supporting other communities’ efforts over writing anything custom and tightly integrated. There are other subtle benefits to this that you might not notice at first. Because most of the components that make up Pylons are actually stand-alone projects in their own right, you will find the following:
You can generally get very good support because you can go to the component-specific mailing list as well as the Pylons one.
You can easily use the components (and the code you have written) outside the Pylons web environment because many of the components were designed to run stand-alone in the first place.
The skills you learn when developing a Pylons application are very transferable because the same tools are used by other companies and organizations in non-web environments.
With these ideas in mind in this chapter, let’s look in detail at how Pylons is really built beneath the surface. You’ll learn about the following:
The Paste Deploy package
The Pylons config file and how to use it to set up middleware
The Pylons middleware stack
The Cascade
What actually happens during a request
But before I can discuss these points, I must discuss one piece of technology that is critical to the way Pylons works: egg entry points.
Egg Entry Points
As you’ll remember from Chapter 2, most of the components used by Pylons are distributed as Python eggs. Eggs have a number of useful features for Pylons developers, but one feature called entry points is particularly useful.
To understand how entry points work, let’s imagine you want to allow the SimpleSite application’s pages to support different types of content. At the moment, they support plain text, but you might want to support HTML, reStructuredText, or some other markup type. Let’s say you decide to design SimpleSite to use a plug-in architecture so that other people can write plug-ins to support each of the different formats. Each plug-in will need a display_name() function so SimpleSite can display a list of available plug-ins in an HTML select field, a markup_to_html() function that will be called every time a page was viewed, and a render_input_field() function that will return various HTML fragments necessary to display an edit field for the particular type of markup.
A plug-in developer can then create a new project that implements each of these functions and packages them up into another egg, but how does SimpleSite know whether the plug-in is installed? This is where egg entry points come in. The plug-in writer would list the functions SimpleSite needs in the entry points part of its setup.py file. The syntax is entry_point_name=package.module:object. Others who write similar plug-ins would define similar entry points.
Then a program that wants to use these plug-ins, be it SimpleSite or a different application, can ask for all the entry points in all the packages installed on the system to obtain a list of entry points. It can then select the packages that have the entry points it needs and load the functions pointed to by the entry points, and it can therefore use the plug-in.
Entry points are arranged in groups with names that can include a period (.), so the SimpleSite application might define entry points in a simplesite.content_plugin group. Each entry point in a group has a name, so the entry point that points to the render_input_field() function defined in the HTMLPlugin might just be called render. SimpleSite can then access the function by looking for the render entry point in the simplesite.content_plugin group. It doesn’t even need to know what the function’s name is in the HTMLPlugin package.
The beauty of the entry points system is that entry points allow packages to expose fixed APIs that other plug-in packages can implement. This system is used a lot within Pylons itself, particularly in relation to the Pylons config files.
Entry Points and websetup.py
If you look at the setup.py file for a Pylons project, this is what the entry point definition looks like:
setup(
    ...
    entry_points="""
    [paste.app_factory]
    main = simplesite.config.middleware:make_app

    [paste.app_install]
    main = pylons.util:PylonsInstaller
    """,
)
This means your Pylons application implements the functionality expected of an application supporting the main entry point of a paste.app_factory group and the main entry point for the paste.app_install group. In effect, your Pylons application behaves like a Paste app factory and as a Paste installer.
You’ll see how the main entry point of a paste.app_factory group is used in the next section, so for the moment, let’s concentrate on the main entry point for the paste.app_install group, which is used by the paster setup-app command.
When you run the paster setup-app command, Paste Script discovers the Pylons application you want to set up by looking at the use line in the [app:main] section of the config file. It looks like this:
[app:main]
use = egg:SimpleSite
The Pylons config file is in a special format understood by the PasteDeploy package. The use line simply tells Paste Deploy which package to use and that the package is an egg. The use line can also be written like this:
[app:main]
use = egg:SimpleSite#main
This tells Paste Deploy that the entry point it is looking for is called main, but this is assumed to be the case anyway if the #main part is ignored.
Once paster setup-app knows the package to look for and the name of the entry point, it looks it up in the paste.app_install group with code similar to this:
from pkg_resources import load_entry_point
entry_point = load_entry_point('SimpleSite', 'paste.app_install', 'main')
installer = entry_point.load()
The load_entry_point() function can also take a version specification such as 'SimpleSite>=0.1.0' as its first argument.
Tip
The pkg_resources package comes with setuptools, the same package that provides the easy_install script. There are other ways of loading objects using entry points too, which you can learn about in the entry points section of the pkg_resources page at http://peak.telecommunity.com/DevCenter/PkgResources#entry-points.
Now, Pylons applications are unusual in the sense that this entry point doesn’t point to an object in the Pylons project in which it is defined but in pylons.util instead. This means the object that is loaded is always pylons.util.PylonsInstaller no matter which Pylons project is being used. The PylonsInstaller object itself is responsible for then calling the setup_app() function in your project’s websetup.py file.
Now that you have seen how entry points can be used to set up a Pylons application, you can learn about how they are used when serving an application.
The Pylons Config File
Pylons is designed to be as easy as possible for everyone to use, and this design philosophy also extends to end users of your Pylons application. People configuring your Pylons application might not be confident configuring WSGI applications in Python source code, so the Pylons config file provides a more familiar environment for them to make configuration changes. It also provides an API to allow them to set up some complex combinations of applications and middleware without needing to get involved in Python code.
In this section, you’ll look at the different ways a Pylons config file can be used and what is actually going on behind the scenes to convert sections from the config file into real Python objects. Then, later in the chapter, you’ll see how you can use the same API as the Pylons tools to construct Python objects directly from the config file.
Note
I won’t be discussing the logging configuration options in this chapter. Although the logging options look similar, they are actually used in a completely different way behind the scenes, so the techniques in this chapter for the other Pylons config options do not apply in any way to the logging options. Logging options are described in Chapter 20.
When you serve a Pylons application via its config file with the paster serve command, these are the steps that take place:
The Paste Script package’s serve plug-in is loaded by paster.
The serve plug-in uses the Paste Deploy package to parse the config file.
Paste Deploy uses code in the [*:main] section to construct a valid WSGI application, pipeline, or composite application.
Paste Deploy uses code in the [server:main] section to load and configure a suitable WSGI server with the pipelines, filters, and application object, and then the server is started.
In the following sections, you’ll concentrate on the work Paste Deploy does to parse the config file, but if you are interested in how to write Paste Script plug-ins so that you can create your own extensions to the paster program, you should read the Paste Script developer documentation at http://pythonpaste.org/script/developer.html. You won’t be surprised to hear that plug-ins rely on entry points.
Default Config Options
The first section in a Pylons config file is the [DEFAULT] section. This contains a set of variables that will make up the global configuration, accessed in a Pylons application as config.global_conf. The options are also passed to each of the functions used to construct objects in other sections of the config file. These options are labeled DEFAULT rather than global_conf because they also work as if they were present in each of the other sections (apart from the logging sections). As an example, consider how the debug option works. In the [DEFAULT] section, the debug option is set to true. This means that in the [app:main] section, if no debug option is specified, debug in that section will also be set to true. In effect, options in the [DEFAULT] section are providing defaults for the other sections. When the debug option is set to false in the [app:main] section, the value in the [DEFAULT] section is overridden, and debugging is disabled.
Now that you understand the role of the [DEFAULT] section, let’s see how Paste Deploy handles the other sections.
Constructing a Server
When Paste Deploy parses a config file, the [server:main] section is inspected to find out which server to use. The Pylons config file typically has a section that looks like this:
[server:main]
use = egg:Paste#http
host = 127.0.0.1
port = 5000
The use line tells the Paste Script package’s server plug-in that it should look up an egg entry point in the Paste package named http. Because this is a [server:main] section, Paste Script knows that the entry point will be in the paste.server_runner entry point group.
The host option tells the server specified in the use line which host to serve the application on. You’ll remember from Chapter 3 that if you want to serve an application on all interfaces, you will need to change the host option to 0.0.0.0 because it is set by default to 127.0.0.1 to prevent you from accidentally serving an application across a network when it is running in debug mode on your development machine. You can also specify a hostname or domain name as long as they can be correctly resolved on your computer.
The port option simply tells the server which port to serve on. For production use, you would use port 80, but for development use, port 5000 is fine.
Let’s take a closer look at how Paste Deploy loads the Paste HTTP server from the use line. First the Paste package has the following as part of its entry point definition:
entry_points="""
    ...
    [paste.server_runner]
    http = paste.httpserver:server_runner
    ...
"""
The use = egg:Paste#http line therefore points to the server_runner() function in the paste.httpserver module. This function is responsible for taking the arguments Paste Deploy sends it from the information it parsed from the config file and returning a running server. The function looks like this:
def server_runner(wsgi_app, global_conf, **kwargs):
    ...
The server_runner() function takes a dictionary of all the options in the [DEFAULT] section of the config file as the global_conf argument and all the options specified in [server:main] as keyword arguments that are gathered up by **kwargs into a dictionary. In this case, the global_conf options aren’t used, but the port and host options passed as keyword arguments are. The wsgi_app argument is the WSGI application to serve. It is based on the other objects specified in the config file. I’ll cover these in the next sections.
Once all the options are in place, the function is called, and this starts the server.
Note
In the next chapter, you’ll also see some extra options that can be used in the [server:main] section to configure the Paste HTTP server with SSL support.
Constructing an Application
Constructing the application happens using a similar mechanism, except Paste Deploy starts by looking for either an [app:main] section, a [composite:main] section, or a [pipeline:main] section in the config file. Only one section other than [server:main] can have the name :main. I’ll cover composite applications and pipelines later in the chapter, so let’s concentrate on what happens when your main section is an [app:main] section.
The Pylons config file [app:main] section starts like this:
[app:main]
use = egg:SimpleSite
...
Paste Deploy knows to look for paste.app_factory entry point group to load an application factory. As was the case earlier in the chapter, because no #name is specified after the definition, Paste Deploy will look for an entry point named main.
Let’s look at SimpleSite’s setup.py file again to see whether it contains a paste.app_factory group:
setup(
    ...
    entry_points="""
    [paste.app_factory]
    main = simplesite.config.middleware:make_app

    [paste.app_install]
    main = pylons.util:PylonsInstaller
    """,
)
In this case, the main entry point in the paste.app_factory group points to the make_app() function in simplesite.config.middleware, so it is this function that is responsible for assembling the Pylons application and middleware that will form the WSGI application and middleware.
The make_app() function looks like this:
def make_app(global_conf, full_stack=True, **app_conf):
    ...
    return app
Once again, the config options from the [DEFAULT] section get passed to the function as global_conf, just as they did when the server was being called, and once again the section-specific options get passed as named parameters that this time are gathered up into the app_conf dictionary.
The WSGI application returned by make_app() as app is what PasteScript’s serve plug-in passes as the first argument to the server_runner() function when it serves the application.
We’ll take a detailed look at what happens in the make_app() function to turn the configuration options into a Pylons application later in the chapter, but there is one point worth noting first. Because the full_stack option is specified as an argument to make_app(), it doesn’t get added to the app_conf dictionary in the same way as all the other variables. There isn’t really a good reason for this, so it might change in a future version of Pylons to be more like this:
def make_app(global_conf, **app_conf):
    full_stack = asbool(app_conf.get('full_stack', 'true'))
    ...
    return app
As you’ve probably realized, the Pylons config file format is slightly more powerful than most frameworks’ config files. It turns out that you can actually use the config file to directly assemble a whole range of WSGI (and hence Pylons) applications into one composite application, and you can even add middleware to individual WSGI (or Pylons) applications using filters and pipelines. Let’s start with composite applications.
Composite Applications
Composite applications are WSGI applications that are made up of other WSGI applications. A good example of a composite app is a URL mapper that mounts WSGI applications at different paths relative to the base URL. Here’s an example that mounts your Pylons application at the path /pylons and mounts an application for handling downloads at the path /downloads:
[composite:main]
use = egg:Paste#urlmap
/pylons = pylons
/downloads = staticapp

[app:staticapp]
use = egg:Paste#static
document_root = /path/to/docroot

[app:pylons]
# The standard [app:main] section goes here
use = egg:SimpleSite
... etc
When this config file is loaded, Paste Deploy will look for the [server:main] section and any other main section and find that this time, rather than the second main section being an [app:main] section, it is a [composite:main] section. It will therefore look up the urlmap entry point name in the Paste package from the paste.composite_app group, and this in turn will load the paste.urlmap.urlmap_factory() to load a paste.urlmap.URLMap. The URLMap will be set up with the two WSGI applications (the Pylons app and the static app) at the appropriate paths.
Notice that for this to work the Pylons configuration section had to be renamed from [app:main] to [app:pylons]. If you hadn’t done this, the two main sections would have conflicted.
One reason for setting up other WSGI applications via a composite section in the config file rather than as a Pylons controller or from a Pylons controller action is that none of the Pylons middleware will be in place. This is useful if you find that the Pylons middleware interferes with some aspect of the behavior of the other WSGI app when it is mounted inside a Pylons application.
It is worth noting that the Paste URLMap in this example will automatically adjust the SCRIPT_NAME and PATH_INFO environment variables so that your WSGI applications mounted under it will be able to work out where they are. This means that as long as the applications you mount use the h.url_for() helper (or their own equivalents), then the URLs generated by the WSGI applications under URLMap will still be correct even though they are mounted at a path other than /.
Pipelines and Filters
Now let’s look at pipelines and filters. Filters are just Paste Deploy’s name for functions that set up WSGI middleware, and pipelines are just Paste Deploy’s name for a middleware chain.
To use filters, instead of specifying the main section to be your Pylons application or a composite application, you specify a pipeline. The pipeline takes just one configuration option, which is a list of the filters to use. The list should always end with the WSGI application you want to serve, which is usually your Pylons application.
Let’s use a pipeline to add the Gzip middleware you developed in the previous chapter. Remember that you added it to the simplesite.lib.middleware module you created. Here’s an example of how the relevant sections of the config file should be set up:
[pipeline:main]
pipeline = gzip pylons

[filter:gzip]
use = egg:SimpleSite#gzip

[app:pylons]
# Your normal Pylons [app:main] section
use = egg:SimpleSite
...
Once again, because you’ve named the pipeline main, the section holding the configuration for Pylons will have to be renamed from [app:main] to something else, and once again this example uses [app:pylons] as a sensible name, so the WSGI application at the end of the pipeline list is named pylons to point to that section.
Note
Pylons config files typically allow you to specify lists, such as the list of filters on the pipeline, on multiple lines. The whitespace will be removed, so you could also write this example like this:
[pipeline:main]
pipeline = filter1
           filter2
           filter3
           app
This syntax makes it easier for you to comment out particular filters, which can sometimes be useful for debugging.
There is just one problem with this example as it stands: the gzip entry point doesn’t exist in the SimpleSite application yet, so this example won’t be able to actually load your Gzip middleware. You could fix this by using the Paste Gzip middleware instead by using use = egg:Paste#gzip, but let’s update the SimpleSite project so that your middleware can be used. To do that, you need to know about factories.
Understanding Factories
In the examples so far, the use option has been used to specify a named entry point within an entry point group in a package, and that entry point has been used to load a function that, when called with arguments reflecting config file options, results in the construction of a particular object such as a server or WSGI application. In Paste Deploy terminology, the function pointed to by the entry point is known as a factory because it produces the desired object.
As you’ve seen, different types of sections in the config file use different entry point groups, and these point to different types of factories. Server sections point to server factories, app sections point to application factories, composite sections point to composite factories, and filters point to filter factories. Factories effectively translate the config options passed to them into appropriate variables that can be used to construct the objects they create. For the Gzip middleware to be usable directly from the config file, you’ll need to create a filter app factory for it. A suitable factory would look like this:
def make_gzip_middleware(app, global_conf, **app_conf):
    compresslevel = int(app_conf.get('compresslevel', 9))
    return GzipMiddleware(app, compresslevel)
This factory would be passed the options in [DEFAULT] as the global_conf argument and the options in the section for that filter as keyword arguments that can be gathered up into the app_conf dictionary. The app is a WSGI application that the middleware should wrap. As you can see, the compresslevel argument (a number from 0–9 is used to specify how much compression should be applied) is turned into an integer if it is present, and if not, the default value of 9 is used. The WSGI application is then wrapped in the middleware and returned.
Add this factory to the SimpleSite lib/middleware.py file you created in the previous chapter if you want to test the example.
Now that the factory is in place, let’s set up the entry point. Filter factories are put in the paste.filter_app_factory entry point group. Edit the SimpleSite setup.py file to update the entry points section:
setup(
    ...
    entry_points="""
    [paste.app_factory]
    main = simplesite.config.middleware:make_app

    [paste.app_install]
    main = pylons.util:PylonsInstaller

    [paste.filter_app_factory]
    gzip = simplesite.lib.middleware:make_gzip_middleware
    """,
)
You’ll need to run python setup.py develop again for the entry point change to be noticed; otherwise, you’ll see this error:
LookupError: Entry point 'gzip' not found in egg 'SimpleSite' (dir: /home/james/Desktop/SimpleSite2b; protocols: paste.filter_factory, paste.filter_app_factory; entry_points: )
Once you’ve reinstalled the application, you will be able to test the filter. Be sure to remove the app = GzipMiddleware(app, 5) line from config/middleware.py; otherwise, you will get a Content-Encoding header with gzip specified twice. The browser won’t understand this and will expect normal CSS or JavaScript instead of compressed content and will therefore most likely complain about illegal characters.
Once the Gzip middleware is disabled in config/middleware.py, update the config file. The lines 7-13 are the ones that have been changed:
- ::
- linenothreshold
5
...
[server:main]
use = egg:Paste#http
host = 127.0.0.1
port = 5000

[pipeline:main]
pipeline = gzip pylons

[filter:gzip]
use = egg:SimpleSite#gzip

[app:pylons]
use = egg:SimpleSite
full_stack = true
cache_dir = %(here)s/data
beaker.session.key = simplesite
beaker.session.secret = somesecret
...
- ::
- linenothreshold
5000
With these changes in place, if you test the SimpleSite application and use LiveHTTPHeaders or Firebug to inspect the response at a URL such as http://localhost:5000/page/edit/6, you’ll see the .js and .css files are still being Gzipped.
There is also an alternative syntax you can use if you simply want to wrap a WSGI application in one piece of middleware. You can use the filter-with option. Here’s the config file with the [pipeline:main] section removed, the [app:main] section reintroduced, and the filter-with option being used. Lines 7 and 9 have changed:
- ::
- linenothreshold
5
...
[server:main]
use = egg:Paste#http
host = 127.0.0.1
port = 5000

[app:main]
use = egg:SimpleSite
filter-with = egg:SimpleSite#gzip
full_stack = true
cache_dir = %(here)s/data
beaker.session.key = simplesite
beaker.session.secret = somesecret
...
- ::
- linenothreshold
5000
If you test this setup, you’ll find it behaves in the same way as before and that the CSS and JavaScript files are Gzipped correctly.
There is one complication with the setup described so far. Paste Deploy, and hence the Pylons config file, supports two types of filters. The one you are using here is called a filter-app because the WSGI application is passed along with the configuration options to the filter-app factory. Another type of factory is one that is passed only the configuration options and that returns a function that, when called, returns the WSGI application wrapped in the filter. Such a factory is called a filter and would look like this:
def make_gzip_middleware_filter(global_conf, **app_conf):
    compresslevel = int(app_conf.get('compresslevel', 9))
    def filter(app):
        return GzipMiddleware(app, compresslevel)
    return filter
Add this to the lib/middleware.py file too, and update the entry points in setup.py (lines 13-14):
- ::
- linenothreshold
5
setup(
    ...
    entry_points="""
    [paste.app_factory]
    main = simplesite.config.middleware:make_app

    [paste.app_install]
    main = pylons.util:PylonsInstaller

    [paste.filter_app_factory]
    gzip = simplesite.lib.middleware:make_gzip_middleware

    [paste.filter_factory]
    gzip = simplesite.lib.middleware:make_gzip_middleware_filter
    """,
)
- ::
- linenothreshold
5000
If you run python setup.py develop again, the new entry points will take effect. When you have both a filter and a filter-app for the same entry point name, Paste Deploy uses the filter, so the new function you’ve added will be used in preference to the previous one.
Alternative Ways of Specifying Factories
So far in this chapter you’ve seen two ways to specify a factory. The first is to use an egg URI such as the following one to identify a factory via an entry point:
[filter:gzip]
use = egg:SimpleSite#gzip
The second approach is to refer to a different section within a config file and have that section be responsible for looking up the factory. You’ve just seen this in the discussion of pipelines where the items in the pipelines were the names of sections, for example:
[pipeline:main]
use = gzip pylons
In addition to these techniques, there are two other approaches. The first is to specify a section in an entirely different config file like this:
[app:main]
use = config:development.ini#main
You’ve actually seen this technique in Chapter 12 when it was used to ensure the test setup used the same configuration as the development setup. In that particular situation, you’ll recall that the approach also had unexpected consequences because the websetup.py setup_app() function was automatically called each time you ran the tests and this interfered with your development database setup.
The final way to specify a factory is to point to it in some Python code:
[filter:gzip]
paste.filter_app_factory = simplesite.lib.middleware:make_gzip_middleware
In this last approach, rather than using the word use, you have to specify the entry point group name as the option name. This might seem slightly counterintuitive, but it is how the config file format works.
Configuration Inheritance
Paste Deploy also supports a very simple form of inheritance so that if you have to specify multiple sections with similar configuration options, you don’t have to write them all out again. Here’s how it works:
[app:main]
use = egg:AnimalTracker
cat = Tabby
dog = St Bernard

[app:other]
use = main
dog = Jack Russell
In this example, the other app inherits all the options from the main app, including the value for the cat option, but it overrides the dog option with the value Jack Russell.
The Pylons config file is actually a very flexible format. You can learn more about it at http://pythonpaste.org/deploy/.
Accessing the Pylons WSGI Application and Other Objects Programmatically
It is all very well for the paster serve and paster setup-app commands to be able to load WSGI applications and middleware from the config file, but sometimes you might want to be able to access them yourself. You frequently need to do this if you want to serve the application with a tool other than Paste’s HTTP server, as you’ll see when you learn about deployment in Chapter 21.
Accessing the Server, Application, and Filters
Paste Deploy provides three functions to allow you to access servers, applications (pipeline, composite, and app sections), and filters:
- loadserver(uri, name=None, **kw)
This function returns a server wrapper function that takes the WSGI application to serve as its first argument. When called, the function uses the options from the [server:main] section, together with the WSGI application passed to it, to start the server. If your config file defines multiple server sections, you can specify the one to use with name. For example, here you load the alternative server instead of the main one:
from paste.deploy import loadserver
server_wrapper = loadserver('config:/path/to/config.ini', name='alternative')
# Serve the application with the options in ``[server:alternative]``
server_wrapper(app)
- loadapp(uri, name=None, **kw)
This is the function you are most likely to use, which returns a WSGI app based on the name of the application section you specify. If you don’t specify a section name, it assumes you want the main section so loads the application based on the information in the [app:main], [composite:main], or [pipeline:main] section in the config file, depending on which you’ve used. For example:
from paste.deploy import loadapp
app = loadapp('config:/path/to/config.ini')
- loadfilter(uri, name=None, **kw)
This function behaves similarly to loadserver() returning a wrapper function that, when called with a WSGI application, returns the application wrapped in the middleware specified in the filter section named name and constructed with the options from that section.
This doesn’t load filter-app factories, just filter factories.
from paste.deploy import loadfilter
filter_wrapper = loadfilter('config:/path/to/config.ini')
# Wrap the application with the middleware specified by ``[filter:main]``
app = filter_wrapper(app)
Notice that each of these functions takes a config URI, not simply a path to a config file as you might have expected. Each of these functions also takes a relative_to argument that you can use if you want to specify a relative location for the URI; you can use it like this:
import os
from paste.deploy import loadserver
server = loadserver('config:config.ini', relative_to=os.getcwd())
# Start the server
server(wsgi_app)
If you try to use a relative path without specifying relative_to, you will get an error explaining no context keyword argument given. This error isn’t particularly informative, but specifying relative_to resolves this error.
Accessing Configuration Options
There are occasions when even the functions described so far aren’t low level enough and you want to get directly at the individual options set. For this circumstance, Paste Deploy provides an appconfig() function that returns a config object. It has the following definition:
def appconfig(uri, name=None, relative_to=None, global_conf=None)
The config object returned has two attributes, local_conf and global_conf, both of which are dictionaries. The .global_conf dictionary contains all the options from the [DEFAULT] section, and the .local_conf dictionary contains all the options from whichever application section you specified as the name argument to appconfig() defaulting to main if no name is specified.
The config object itself behaves like a dictionary too. It has all the keys of both the local_conf dictionary and the global_conf dictionary, but where two keys have different values, the local_conf value overrides the global conf value. The config object therefore has the same values you would access as pylons.config['app_conf'] and the .global_conf attribute contains the same values you would access as pylons.config['global_conf'].
Here’s an example demonstrating this:
>>> from paste.deploy import appconfig
>>> config = appconfig('config:/path/to/config.ini')
>>> combined = {}
>>> combined.update(config.global_conf)
>>> combined.update(config.local_conf)
>>> print config.items() == combined.items()
True
As you can see, the configuration in the config object itself matches that obtained by combining the global_conf and local_conf dictionaries.
Creating a Pylons Application with Paste Deploy
Using the Paste Deploy loadapp() function described earlier is the best way of getting access to the Pylons WSGI application. At the start of this chapter, you learned how to use entry points to access the make_app() function in your project’s config/middleware.py file. This function is a standard Paste Deploy app factory, so although you can create a Pylons WSGI application object by calling it directly with the configuration options you want to create the application with, it is usually much easier to use the loadapp() function. This function does both steps at once, looking up the entry point and calling the make_app() factory with the configuration options from the config file.
You can get the WSGI application object from your Pylons configuration file like this:
from paste.deploy import loadapp
wsgi_app = loadapp('config:/path/to/simplesite/development.ini')
You can then serve the file using a WSGI server. Here is an example using the WSGI Reference Implementation server included in Python 2.5 and newer:
from paste.deploy import loadapp
wsgi_app = loadapp('config:/path/to/config.ini')

from wsgiref import simple_server
httpd = simple_server.WSGIServer(('',8000), simple_server.WSGIRequestHandler)
httpd.set_app(wsgi_app)
httpd.serve_forever()
The paster serve command you are used to using while developing Pylons projects combines these two steps of creating a WSGI app from the config file and serving the resulting file to give the illusion that it is serving the config file directly. You can test the example by visiting http://localhost:8000.
The Pylons Middleware Stack
Let’s just recap what you’ve learned so far about how a Pylons application is constructed:
A Pylons application is loaded from a config file in a format understood by the Paste Deploy package.
The Paste Deploy loadapp() function is called to parse the config file.
The use option in the main application section (be it an [app:main], [pipeline:main], or [composite:main] section) is used to determine the factory to use to create the Pylons application.
The make_app() factory in the project’s config/middleware.py file is called and returns the configured Pylons app ready to serve requests.
If you open a Pylons project’s config/middleware.py file and look at the make_app() function, you will see that a WSGI application named app is created. This is your Pylons application object and is what is ultimately responsible for calling the actions in the controllers you have created. The make_app() function looks like this at the time of writing:
def make_app(global_conf, full_stack=True, **app_conf):

    # Configure the Pylons environment
    load_environment(global_conf, app_conf)

    # The Pylons WSGI app
    app = PylonsApp()

    # CUSTOM MIDDLEWARE HERE (filtered by error handling middlewares)

    # Routing/Session/Cache Middleware
    app = RoutesMiddleware(app, config['routes.map'])
    app = SessionMiddleware(app, config)
    app = CacheMiddleware(app, config)
    if asbool(full_stack):
        # Handle Python exceptions
        app = ErrorHandler(app, global_conf, **config['pylons.errorware'])

        # Display error documents for 401, 403, 404 status codes (and
        # 500 when debug is disabled)
        if asbool(config['debug']):
            app = StatusCodeRedirect(app)
        else:
            app = StatusCodeRedirect(app, [400, 401, 403, 404, 500])

    # Establish the Registry for this application
    app = RegistryManager(app)

    # Static files (If running in production, and Apache or another web
    # server is handling this static content, remove the following 2 lines)
    static_app = StaticURLParser(config['pylons.paths']['static_files'])
    app = Cascade([static_app, app])
    return app
After the app object is created, it is then wrapped in lots of different WSGI middleware components. Each of the components performs a different task:
- RoutesMiddleware
This is responsible for matching a URL against the route map you’ve specified in config/routing.py and setting up the routing variables.
- SessionMiddleware
This is responsible for providing the Pylons session global that provides the session functionality you used in Chapter 8 to create the flash message.
- CacheMiddleware
This sets up a Beaker CacheManager and provides the caching facility you saw in Chapter 5 when I covered caching templates. The SessionMiddleware is also provided by the Beaker package.
- ErrorHandler
This catches any exceptions that have occurred during the processing of a request and, depending on the settings in the config file, either will return a 500 Internal Server Error for the StatusCodeRedirect middleware mentioned next to handle, will email an error report or will start the Pylons interactive debugger you learned about in Chapter 4 to help you track down where the error occurred.
- StatusCodeRedirect
This catches responses with certain HTTP status codes such as 401, 403, 404, and sometimes 500 and internally redirects the request to the error controller in your project’s controllers/error.py file so that a nice-looking error page can be generated.
- RegistryManager
This keeps track of which of the Pylons global variables should be used in each thread of execution so that information from one request doesn’t get confused with information from another request being handled by Pylons at the same time.
- Cascade
This handles two apps, a StaticURLParser application to serve files from the public directory and the Pylons app itself. On each request the two applications are called in turn until one of them is able to handle the request URL.
The reason this architecture is so powerful is that you are free to add your own middleware to the stack, enabling you to completely change the way Pylons behaves if you want. For example, if you didn’t want the error documents support, you could comment out the StatusCodeRedirect middleware. If you wanted all the responses to be Gzip compressed to save bandwidth, you can simply add Gzip middleware, as you’ve seen already.
Application State vs. Request State
Once the application has been created with all the middleware components correctly set up, it is held in memory by the server, ready to receive a request. The application object, the middleware, and all the other Pylons objects that were configured when make_app() was called will persist between each request. This means the make_app() factory is called only once when the Pylons application is created, but the app object returned from make_app() is called on each request. This makes Pylons very fast because the app object doesn’t need to be re-created to handle a request, but it also means that the process of creating a Pylons application is completely separate from the process of handling a request.
In the next sections, you’ll see in detail which processes occur when the app object is being set up and which occur before and after a request has been handled by a controller action.
Creating an Application
You’ve already seen the objects and middleware involved in the creation of an application, but in the following sections, you’ll see in detail what happens in each of the components as the application is created.
Loading the Pylons Environment
The first thing that happens in make_app() is a call to load the environment:
# Configure the Pylons environment
load_environment(global_conf, app_conf)
This function is actually located in your project’s config/environment.py file and is responsible for any configuration of your application that you don’t want to expose to the end user of an application in the config file. You have to be slightly careful when editing config/environment.py because some aspects of Pylons’ behavior rely on the objects that are set up there.
The load_environment() function is responsible for the following:
Setting up the paths that will be used in your project to access controllers, static files, and templates. By default, the paths are configured to point to your project’s controllers, public, and templates directories, respectively.
Initializing the Pylons config object with information about the project including where the function to set up the routes is, which module should be used as the h object within templates, and which object should be used as the app_globals object. By default, these are set to the config/routing.py file’s make_map() function, the project’s lib/helpers.py module, and an instance of the Globals class in lib/app_globals.py, respectively.
Using the config object to indirectly attach a mako_lookup attribute to the app_globals object, which will later be used by the render() function to render Mako templates. The mako_lookup attribute is actually an instance of a Mako TemplateLookup object, and as you’ll recall from Chapter 5, this can be customized to change Mako’s behavior or replaced if support for a different templating language is required.
Setting up a SQLAlchemy engine and initializing the model (if you chose a project template that included SQLAlchemy when running the paster create command). The way the engine is created and the role of init_engine() is explained in Chapter 7.
At the end of the load_environment() function are these lines:
# CONFIGURATION OPTIONS HERE (note: all config options will override
# any Pylons config options)
Any further customization you want to do should usually happen after these lines.
The PylonsApp Instance
After the environment has been loaded to set up the app_globals, h, and config objects as well as the template engine and SQLAlchemy (if necessary), a Pylons application is created. This is done with the following lines in make_app():
# The Pylons WSGI app
app = PylonsApp()
The PylonsApp instance is the very heart of your Pylons application; it is defined in the pylons.wsgiapp module, and its instance (app) is a valid WSGI application. At this stage, all app has to do is initialize itself with the config object, the app_globals object, and the package name and various options that will be used to set up the request and response during a request. This all happens behind the scenes and is not something you would normally have to deal with. You’ll hear more about the PylonsApp instance when I discuss how it behaves during a request.
The Middleware Chain
Next, the PylonsApp instance app is wrapped in a series of different middleware components, each of which is initialized:
# Routing/Session/Cache Middleware
app = RoutesMiddleware(app, config['routes.map'])
app = SessionMiddleware(app, config)
app = CacheMiddleware(app, config)
First the RoutesMiddleware is initialized and is passed the route map it will be expected to deal with via the config['routes.map'] object that was set up in the call to load_environment().
Note
You might be wondering how the config object was set up even though it wasn’t passed directly to load_environment(). Both config/middleware.py and config/environment.py import the object from the pylons module, which itself imports it from pylons.configuration. The config object is defined as a module global and is an instance of pylons.configuration.PylonsConfig. It isn’t an ordinary global, though; it is inherited from a paste.config.DispatchingConifg object, which can keep different configurations separate in different threads. Because both files are accessing the same object, changes made in config/environment.py are reflected in config/middleware.py.
After the RoutesMiddleware is set up, SessionMiddleware and CacheMiddleware are both set up. These use the beaker.* configuration options from the config object in order to initialize themselves. The options specify where the session and cache stores should be set up. By default, this happens in a data directory relative to the config file being used to serve the application.
What happens next depends on whether you’ve set full_stack to true or false in the configuration file. If it is true, which is the default, then the ErrorHandler and StatusCodeRedirect middleware will be set up; otherwise, they’ll be ignored.
if asbool(full_stack):
    # Handle Python exceptions
    app = ErrorHandler(app, global_conf, **config['pylons.errorware'])

    # Display error documents for 401, 403, 404 status codes (and
    # 500 when debug is disabled)
    if asbool(config['debug']):
        app = StatusCodeRedirect(app)
    else:
        app = StatusCodeRedirect(app, [400, 401, 403, 404, 500])
If the fullstack option is enabled, the ErrorHandler is set up with options from config['pylons.errorware']. These in turn are set up when the config object’s init_app() method is called in config/environment.py and contain the options that will be used in error reporting such as the e-mail address to send error reports to, the SMTP server to use, and who the e-mail should appear to have come from. The values used are all obtained from the [DEFAULT] section of the config file. The subject of the e-mail and the error log to use are also passed to the ErrorHandler in the same dictionary, but these values cannot be configured in the config file.
If debug mode is on, the ErrorHandler middleware sets up the WebError package’s EvalException middleware, which provides the Pylons Interactive Debugger you first saw in Chapter 4; otherwise, it sets up the WebError package’s ErrorMiddleware to handle the e-mail error reports.
The StatusCodeRedirect middleware doesn't do anything particularly exciting during application initialization, it just wraps itself around the app object.
Next to be wrapped around the app object is the RegistryManager middleware. This doesn’t need any configuration as the application is being created, but its importance will become apparent when you look at how Pylons handles a request in the next section.
# Establish the Registry for this application
app = RegistryManager(app)
The final piece of middleware is the Cascade. This is configured with an instance of a StaticURLParser as its first argument. The StaticURLParser will be responsible for serving static files and is configured with config['pylons.paths']['static_files'], which was set up in config/environment.py to point to your project’s public directory. The second item in the list specified as an argument to the Cascade is the app object all the middleware components have been wrapping.
# Static files (If running in production, and Apache or another web
# server is handling this static content, remove the following 2 lines)
static_app = StaticURLParser(config['pylons.paths']['static_files'])
app = Cascade([static_app, app])
return app
At this point, the application state has been configured. All the middleware has been initialized, and the PylonsApp and StaticURLParser WSGI applications have been initialized. At this point, the app object is ready to handle a request, and this is where the middleware components play an important part.
With the application state successfully configured, make_app() can return the app object to the server, ready to be called to handle a request.
Handling a Request
You’ll remember from the previous chapter that when a WSGI application is called (whether wrapped in middleware or not), it is passed two arguments, the environ dictionary and the start_response() callable. Let’s assume for the moment that there are no pipelines or composite applications set up in the config file. In that case, because the Cascade middleware was the last middleware that wrapped the app object, it will be the first one to be passed the environ and start_response() arguments.
This means that although the middleware components were set up from top to bottom when they were being initialized, it is actually the middleware at the bottom of the config/middleware.py file that receives the request information first, and the request information passes from the bottom of the middleware chain toward the top and eventually to the PylonsApp instance, app. Figure 17-1 illustrates this request behavior.
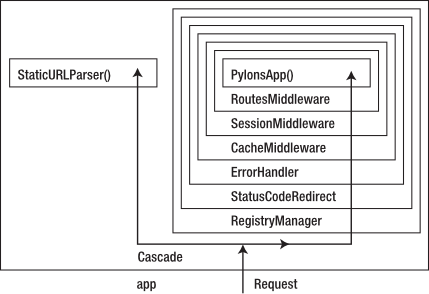
The Cascade
The first piece of middleware to be called on any request is the Cascade. When it is passed environ and start_response(), it first calls static_app to see whether the URL requested matches a file in your project’s public directory. If static_app returns a 404 Not Found response, the Cascade will instead call the main Pylons application.
Note
This is why you need to delete the public/index.html file before the root URL of the site will serve content from a controller. If you changed the order of the applications in the Cascade, you would not need to delete the file because the Pylons application would be checked first before the public directory, but since more files are likely to be handled by static_app than Pylons during each page view, it is usually more efficient to keep the order as it is.
The next middleware in the chain is the RegistryManager, which is responsible for managing the Pylons globals in a thread-safe way. Let’s look at it in detail before returning to the middleware chain.
The Registry Manager, StackedObjectProxy, and Pylons Globals
Pylons aims to avoid the use of any complex Python code that appears to behave in a “magical” way, but there is one aspect of the Pylons architecture that often appears to be magic to those who haven’t seen anything similar before: the Pylons globals. People wonder how a module global such as the Pylons template context c can be available throughout an application and yet take a different value depending on the thread in which it is executing.
The answer is that Pylons globals (such as c, request, and response) are all instances of the paste.registry.StackedObjectProxy class and not the objects they appear to be at all. When you access their properties or methods, they return the result of applying that action to the object they are associated with in the current thread so that they behave as if they were that object. Put another way, they proxy attributes to the correct object in a thread-safe way based on the scope of the request in which they run to give the illusion of being the objects themselves.
You can always access the underlying object for a particular global in the current request by calling the _current_obj() method on a StackedObjectProxy. For example, to obtain the actual request object being used in a request, rather than the StackedObjectProxy that is proxying to it, you could use pylons.request._current_obj().
Now that you know what a StackedObjectProxy is, let’s look at the role of the RegistryManager during a request. Here’s an example based on the Paste Registry documentation, which demonstrates how the globals are set up and used in a pure-WSGI environment:
from paste.registry import RegistryManager, StackedObjectProxy
from pylons.controllers.util import Request

request = StackedObjectProxy()

# WSGI app stack (imagine the middleware stack in config/middleware.py)
app = App()
app = RegistryManager(App)

# WSGI app (imagine the PylonsApp)
class App(object):
    def __call__(self, environ, start_response):
        obj = Request(environ)  # The request-like theread-local object you want
                                # to access via pylons.myglobal
        if environ.has_key('paste.registry'):
            environ['paste.registry'].register(request, obj)
            ...
The RegistryManager adds a new Registry() as environ['paste.registry'] on each request and calls the existing registry’s prepare() method to set it up for the new registry context.
The registration process involves telling the registry which objects in the current thread should be attached to which globals. This ensures that during the scope of the request, attributes from the correct real object will be returned any time you access an attribute or method of one of the Pylons global objects, even though the global is really a StackedObjectProxy.
You’ll see in the section “The Role of PylonsApp” that the registration happens within the PylonsApp instance app.
Tip
If you ever see StackedProxyObject errors in your Pylons application, it may be because you are trying to access one of the Pylons globals outside the scope of a request and therefore before Pylons has had a chance to set up and register the real object with the particular StackedObjectProxy global it is associated with.
Returning to the Middleware Chain
Now that you have an idea of how the RegistryManager middleware works, let’s continue looking at how the other middleware components in the chain behave during a request.
If the full_stack option is set to true, the StatusCodeRedirect and ErrorHandler middleware are called. The StatusCodeRedirect middleware creates a copy of the request information, but it doesn’t do anything with it until it deals with the response after a controller action is called. Next, the CacheMiddleware and then the SessionMiddleware are called, each adding information to the environ dictionary that the PylonsApp app instance will use when it is eventually called to set up the Pylons cache and session functionality.
Next, the RoutesMiddleware is called. This now assembles the request URL from the information in the environ dictionary it is passed and works through the route map as you saw in Chapter 9. It adds the routing variables it matches to the environ dictionary as environ['wsgiorg.routing_args'].
Finally, the PylonsApp instance, app, gets called itself.
The Role of PylonsApp
The ultimate responsibility of app is to call a Pylons controller action and return a response, but it has to do a number of things first. Each of these is handled by a different method on the PylonsApp class, and they are called in the order described here:
- PylonsApp.setup_app_env()
This creates all the global objects for the request including the Pylons request and response objects, the translator used for internationalization, and the Pylons template context global c. It adds these and other objects to the template context object as attributes and makes it available as pylons.pylons in the environ dictionary.
- PylonsApp.register_globals()
If the RegistryManager middleware is present, each of the Pylons globals is registered with the registry. This includes pylons.response, pylons.request, pylons.app_globals, pylons.config, pylons.h, pylons.c, and pylons.translator. It will also register pylons.session and pylons.cache if the SessionMiddleware and CacheMiddleware are present. Pylons also adds a pylons.url object that is simply the current request URL.
At this point, all of these objects, when imported from the pylons module in your application, will proxy the attributes and methods you call on them to the correct underlying objects for the current request thread (that is, the ones created in the PylonsApp.setup_app_env() call or as the request passed through the middleware stack).
- PylonsApp.load_test_env()
If Pylons is operating in testing mode, this method will be called to add the standard Pylons environment variables described earlier to environ['paste.testing_variables'] so that they are available as attributes of the paste.fixture response object you learned about in Chapter 12. These currently include the attributes req, response, tmpl_context and its alias c, app_globals and its alias g, h, and config. If the session and cache middleware are present, it also sets up session and cache attributes.
With all the objects correctly set up and registered, the dispatch to the controller action can begin. The following methods on PylonsApp are called in this order:
- PylonsApp.resolve()
This uses the routing arguments that the RoutesMiddleware added to environ['wsgiorg.routing_args'] to retrieve a controller name and return the controller instance from the appropriate controller module.
- PylonsApp.dispatch()
Finally, once the controller instance has been created, PylonsApp can call its __call__() method with environ and start_response() to begin the dispatch.
Note
You can override these last two methods to change how controllers are resolved and dispatched to if you want to customize Pylons’ behavior. You just need to use your derived object in config/middleware.py instead of PylonsApp.
Even though the controller has now been dispatched, there is still some more you need to know about how the controller behaves to call the action.
The Role of WSGIController
You’ll remember that your project’s controllers are inherited from BaseController in your project’s lib/base.py file and that BaseController is inherited from pylons.controller.core.WSGIController. This means that when PylonsApp instantiates and calls one of your project’s controllers, it is actually calling the WSGIController.__call__() method.
The WSGIController.__call__() method proceeds as follows. First, it checks to see whether the controller has a __before__() method. If it does, it calls its _inspect_call() method that then calls _get_method_args() to find out which arguments the method expects. The __before__() method is then called with those arguments.
Next, the controller action itself needs to be called. This is done with a call to the controller’s _dispatch_call() method, which finds out which action to call from the routing variables and then calls __inspect_call() itself to find out the arguments the action needs and to call the action with those arguments.
Finally, after the action is called, the __call__() method checks to see whether an __after__() method exists. If it does, it will always be run on each request after the action, even if the action raises an exception or issues a redirect. Once again, __after__() is run by a call to the _inspect_call() method.
If an action is not found to handle the request, the controller will raise an “Action Not Found” error in debug mode; otherwise, a 404 Not Found error will be returned.
Handling the Response
Once the controller action is finally called, it can perform all manner of operations using the Pylons objects that have just been described. The whole of the first two parts of the book were dedicated to some of the ways Pylons could be used, so I won’t repeat them here.
The action can do any of the following:
Call the abort() or redirect_to() functions to halt the request
Trigger an unexpected exception
Return a response that requires an error document
Return a function to stream content
Return a Unicode object or UTF-8 encoded string as a result
Let’s see how Pylons handles each of these cases.
abort(), redirect_to(), and HTTPException
During each call to WSGIController’s _inspect_call() method when the request was being handled, the call to the method being inspected is wrapped in a try...``except`` block. If a certain type of exception known as an HTTPException occurs, Pylons will turn that exception into a normal HTTP response. This might seem like an odd behavior, but you’ll recall that Pylons provides the functions abort() and redirect_to() in pylons.controllers.util. These functions work by raising an HTTPException when they are called, so it is the code in the _inspect_call() method that is responsible for making these functions result in the correct HTTP response.
Since the _inspect_call() method is also used to call the __before__() and __after__() actions if they exist, abort() and redirect_to() can also be used in those actions.
Exception Handling
When an exception that isn’t an HTTPException is raised, it goes straight through the try...``except`` block in _inspect_call() and isn’t caught until another try...``except`` block in the error-handling middleware. If debug mode was enabled, the EvalException middleware would have been set up. If not, the ErrorMiddleware would be in place.
If the EvalException middleware is set up, you will see the familiar Pylons Interactive Debugger. If not, an error report gets e-mailed, and the exception is turned into a 500 Internal Server Error response by the ErrorMiddleware.
The StatusBasedRedirect middleware is below the error-handling middleware, so it receives the response after the error handler. At this point, the StatusCodeRedirect middleware can’t distinguish between a 500 error triggered by the ErrorMiddleware or a 500 response from a Pylons controller action, so both are treated in the same way. In debug mode 500, responses are ignored by the StatusCodeRedirect middleware; with debug mode disabled, an error document is displayed.
Error Documents
When the StatusCodeRedirect middleware receives a response that it was set up to intercept, it uses a copy of the request information (which it made when the request was passing through it toward the controller action) to start a subrequest to the error controller’s document() action to generate the familiar Pylons error page. You’ll see more about error documents, how they work, and how to customize them in Chapter 19.
Streaming Content
If you need to stream content, you can always use one of the techniques described in Chapter 16 to mount a WSGI application in a Pylons application and set up the WSGI application to stream the content, but Pylons controller actions support streaming directly too.
You need to turn debug mode off to stream content because the exception middleware needs to have the entire response finished before it will pass on the result farther down the middleware chain.
Turn off debug mode in your INI file by uncommenting the following line:
#set debug = false
Now that it’s disabled, returning an iterator object or a generator is sufficient to start streaming output. Here’s an example that sends a new number every two seconds:
import time

class StreamingController(object):

    def output(self):
        def output_pause():
            number = 0
            while 1:
                number += 1
                yield number
                time.sleep(2)
        return output_pause()
If you were to set this up in a Pylons project and visit http://localhost:5000/streaming/output, you should now see a number sent every two seconds, continuing forever. If not, ensure you have set debug to false in the config file.
Caution!
You have to be slightly careful when using time.sleep() in a production system because it causes the thread in which the Pylons application is running to simply sleep. If you are running Pylons on a multithreaded server using a worker pool of ten threads (which is the default setup you will be using when running paster serve), there is a chance that in busy periods all your threads could just be sleeping rather than serving requests, and this will adversely affect the performance of your Pylons application.
Returning Unicode from an Action
Now that you’ve seen some of the less usual cases for controller action responses, let’s look at what happens during a normal response when you return a string, most likely as a result of a call to render() to render a template.
First the response passes back from the WSGIController.__call__() method and the PylonsApp.dispatch() method to the middleware chain. The response will start at the middleware defined at the top of config/middleware.py and end with the ones defined at the bottom. As it passes through the SessionMiddleware, it will have a session cookie added to it if there was a session cookie in the request or if you called session.save() during the request to create a session store for the current user. The response will then pass back through the other middleware without being altered and eventually be sent back to the server where it is passed to the browser.
Summary
This chapter covered a lot including entry points, the config file format, factories, and the details of Pylons’ request and response architecture. There is a lot going on in Pylons, but I hope this chapter will have given you a good enough overview for you to be able to explore the Pylons code for yourself.
Pylons was always designed to be highly customizable and to expose all the relevant parts so that you can change it yourself if you need to do so. Feel free to read the Paste and Pylons source code to get a better idea of how they work and to experiment with alternative setups in your own Pylons applications.